Effective WordPress SEO Optimization For Beginners
- Published on
- Why is WordPress Popular for Website SEO?
- Steps to Set Up SEO for WordPress Website
- Check Website Visibility Settings
- SEO-Friendly Permalink Structure
- Choosing Between WWW and Non-WWW
- Choosing the Best SEO Plugins
- Using XML Sitemaps
- Website Verification on Google Search Console
- Keyword Research
- Optimizing SEO for Posts and Web Content
- Using HTTPS Protocol
- Using Categories and Tags Effectively in WordPress
- Building an Effective Internal Linking Strategy
- Optimizing WordPress Comments for SEO
- Nofollow External Links on Your Website
- Optimizing WordPress Website Security
- Optimizing Website Speed and Performance
- Image Optimization for WordPress SEO
- Leveraging Social Media for SEO Support
- Choosing the Right WordPress Theme
- Optimizing On-page SEO Factors
- Using Yoast SEO Plugin for Effective SEO Optimization
- Verifying Your Website on Other Search Engines
- Creating Archive Pages to Support SEO
- Optimizing Heading Tags H1, H2, H3, H4…
- Optimizing Meta Description
- Optimizing SEO-Friendly Permalinks
- Optimizing Anchor Text
- Optimizing Breadcrumb Navigation
- Optimizing 404 Pages and Redirect Links
- Optimizing Structured Data with Schema Markup
- Optimizing Mobile SEO
- Conclusion
Why is WordPress Popular for Website SEO?
WordPress has become a popular platform for website SEO optimization due to its search engine-friendly structure and high customization capabilities. This content management system allows users to easily create SEO-friendly URLs, use header tags, meta descriptions flexibly, and integrate powerful plugins like Yoast SEO or Rank Math. Additionally, WordPress regularly updates to align with Google's new algorithms, helping websites maintain good SEO performance. Moreover, WordPress supports website speed optimization and security with tools like WP Rocket, SSL, and the HTTPS protocol, all of which contribute to higher search engine rankings and improved user experience.
Additionally, with the ability to categorize content through Categories and Tags, users can easily organize their content, helping search engines better understand the website structure and index pages more effectively. All of these advantages make WordPress an ideal choice for building an SEO-friendly website efficiently and sustainably.
Steps to Set Up SEO for WordPress Website
Check Website Visibility Settings
Before starting SEO optimization, make sure your WordPress website isn’t blocked from search engines. Many beginners encounter the issue of their website not being indexed because they accidentally enabled the option to block search engines in the settings. To check and fix this:
- Go to WordPress Dashboard → Settings → Reading.
- Look for the Search Engine Visibility section and ensure the box “Discourage search engines from indexing this site” is unchecked.
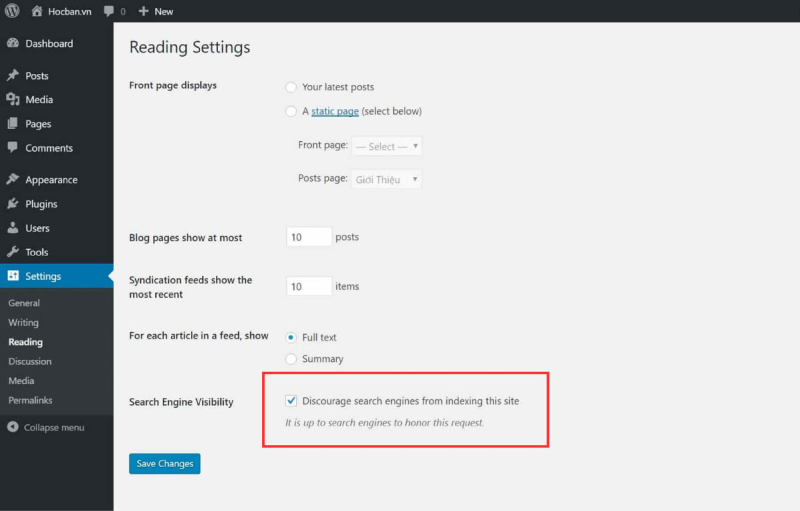
If this option is enabled, search engines like Google won’t be able to index your site, regardless of how high-quality your content is. Disabling this option ensures your website is ready to appear in search results, marking the foundational step in an effective SEO strategy.
SEO-Friendly Permalink Structure
The URL structure of a website plays an important role in SEO optimization. A concise URL with relevant keywords helps search engines understand the webpage content and increases its visibility in search results. To set up an SEO-friendly permalink structure in WordPress, follow these steps:
- Go to WordPress Dashboard → Settings → Permalinks.
- Select the Post name option instead of default URL formats like "day-month" or "post ID."
Example:
- Non-optimized URL:
https://domain.com/?p=123 - Optimized URL:
https://domain.com/wordpress-seo-guide
Using the “post name” structure makes URLs more intuitive, easier to remember for users, and easily indexed by search engines. Also, avoid using special characters or excessively long URLs, as they may negatively impact user experience and SEO rankings.
You can also combine Internal Links with optimized URLs to build a solid internal linking network that helps boost the ranking of related posts within the same topic.
Choosing Between WWW and Non-WWW
An essential step in WordPress website SEO is deciding whether to use the www or non-www version of your website and ensuring consistency throughout the system. This decision affects SEO performance, as search engines may consider www.domain.com and domain.com as two different addresses if not configured properly.
How to Configure:
- Go to Settings → General in the WordPress dashboard.
- In the WordPress Address (URL) and Site Address (URL) fields, enter your preferred version (www or non-www).
- Check to ensure all links redirect to the primary version to avoid duplicate content issues.
Example:
- If you choose the www version, all visits to https://domain.com will automatically redirect to https://www.domain.com, and vice versa.
This process not only reinforces brand consistency but also ensures your website isn't penalized by search engines due to duplicate URLs. Additionally, you can set up 301 Redirects in the .htaccess file or use plugins like Rank Math SEO or Redirection to streamline this process.
Choosing the Best SEO Plugins
Using SEO plugins is essential for effective SEO optimization on WordPress. SEO plugins help you manage and improve important elements like meta tags, XML Sitemaps, keyword analysis, and real-time content optimization. Here are some popular and powerful SEO plugins you should consider:
Yoast SEO
- Pros: User-friendly interface, detailed analysis of primary keywords and content.
- Key Features: On-page SEO improvement suggestions, automatic XML Sitemap generation, meta tag optimization, and breadcrumb configuration.
- Recommendation: Suitable for beginners and experts who want full control over SEO elements.
Rank Math SEO
- Pros: Supports multiple target keywords in one post and offers detailed SEO analysis.
- Key Features: Redirect management, image SEO optimization, and overall website SEO status checks.
- Recommendation: Ideal for users seeking a robust tool with an optimized interface.
All in One SEO Pack (AIOSEO)
- Pros: Integrates security features such as blocking bad bots and automatic SEO optimization.
- Key Features: Robots.txt management, automatic sitemap creation, and social media optimization (Open Graph).
- Recommendation: Suitable for e-commerce websites and personal blogs.
The choice of an SEO plugin depends on your needs and the complexity of your website. However, avoid installing multiple SEO plugins at once to prevent system conflicts and performance issues. For beginners, Yoast SEO or Rank Math SEO are accessible choices with detailed guides to help you quickly get familiar with optimizing SEO for posts and landing pages.
Internal link: If you're interested in On-page SEO optimization, check out our detailed On-page SEO guide.
Using XML Sitemaps
An XML Sitemap is a file containing a list of important URLs on your website, helping search engines like Google and Bing understand your website structure and index pages more quickly. This is an essential part of SEO optimization for WordPress websites, especially if your site has multiple categories and posts.
If you're unsure about Sitemaps, check out our article: What is a Sitemap? How to Create and Submit a Sitemap on Google Search Console
How to Create an XML Sitemap in WordPress:
-
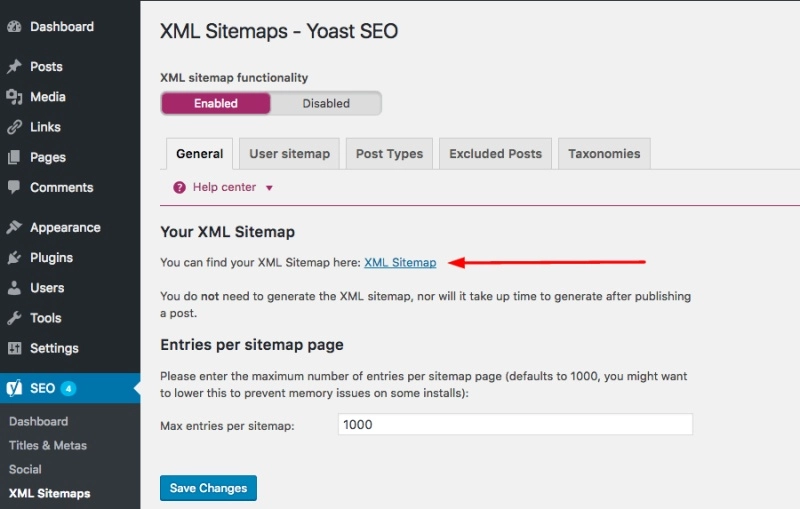
Using Yoast SEO Plugin:
- Go to SEO → General → Features and enable the XML Sitemaps option.
- Click the “View XML Sitemap” link to check if the sitemap file has been created.
-
Using Rank Math SEO:
- Go to Rank Math → Sitemap Settings and customize the content types to include in the sitemap, such as posts, pages, categories, etc.
-
Submitting Sitemap to Google Search Console:
- Log in to Google Search Console and select your website.
- Go to Sitemaps and enter the XML Sitemap URL, for example:
https://domain.com/sitemap_index.xml. - Click Submit and wait for Google to process it.
Why XML Sitemaps Are Important:
- Helps search engines quickly discover newly created or updated pages.
- Ensures important pages are not missed during indexing.
- Speeds up the recognition of in-depth articles and internal links within the website.
A good XML Sitemap should exclude unnecessary content such as author pages or internal search pages to avoid data dilution. Regularly check the sitemap file to ensure there are no errors or duplicate URLs that could affect search engine indexing.
Website Verification on Google Search Console
Google Search Console (GSC) is a free tool by Google that helps you monitor your website's performance on search engines and receive alerts about issues such as indexing errors, broken links, or security problems. Verifying your site on GSC is an important step in the WordPress SEO process, allowing you to proactively optimize and improve keyword rankings.
Steps to Verify Your Website on Google Search Console:
- Visit Google Search Console.
- Click Start Now and log in with your Google account.
- Choose a verification type:
- Domain: Requires DNS record verification (suitable for advanced users).
- URL Prefix: Allows verification through various methods such as uploading an HTML file, meta tags, or via Google Analytics.
- For HTML File Verification:
- Download the HTML verification file provided by Google.
- Upload the file to the root directory of your website via FTP or File Manager in your hosting.
- Go back to Google Search Console and click Verify.
Benefits of Using Google Search Console:
- Check the indexing status of your website and request quick indexing for new pages.
- Analyze keywords users search to access your website.
- View reports on issues like 404 Not Found, redirect errors, or AMP errors.
- Monitor the search performance of individual pages.
Verifying your website in GSC ensures you receive alerts from Google to promptly address issues affecting rankings. Additionally, you can integrate Google Search Console with Google Analytics to comprehensively track user behavior and SEO performance.
Learn more about how Google Search Console can assist in website SEO here
Keyword Research
Keyword research is a crucial step in WordPress SEO, helping you understand the terms users search for and optimize content effectively. Choosing the right keywords not only helps your posts reach the right audience but also improves search engine rankings.
Effective Keyword Research Methods:
-
Using Keyword Research Tools:
- Google Keyword Planner: Helps you search for keywords by niche and view monthly search volumes.
- Ahrefs or SEMrush: Provides detailed keyword analysis, competition level, and related keyword suggestions.
- Ubersuggest: Offers long-tail keyword suggestions to help you target specific user search intents.
-
Identifying Keyword Types:
- Primary Keywords: Describe the main topic of your post (e.g., “WordPress SEO”).
- Secondary Keywords: Supportive or related keyword variations to the primary keyword (e.g., “WordPress SEO guide,” “best SEO plugin for WordPress”).
-
Analyze Search Intent:
- Informational: Users search for knowledge or general information (e.g., “What is WordPress”).
- Transactional: Users search with the intention to make a purchase or perform a specific action (e.g., “buy SEO plugin”).
Tips for Optimizing Keywords in Posts:
- Insert primary keywords into the title, H1 tag, URL, and opening paragraph.
- Distribute secondary keywords naturally throughout the content to avoid being penalized for keyword stuffing.
- Utilize keywords in alt tags for images and meta descriptions to improve search result visibility.
Thorough keyword research and understanding search intent enable you to create SEO-optimized content that meets user needs and improves your chances of ranking higher on Google.
Optimizing SEO for Posts and Web Content
Optimizing posts is crucial to ensure your WordPress website is search-engine friendly and engaging for readers. An SEO-friendly post should meet both technical requirements and provide high-quality content to increase visibility in search results.
Steps to Optimize SEO for Posts:
-
Post Title (Title):
- Ensure the title contains the primary keyword and does not exceed 60 characters.
- Create a compelling title that clearly represents the post’s content to increase click-through rates (CTR).
-
Heading Tags (H1, H2, H3):
- Use H1 for the main title and H2, H3 for subheadings to structure the content clearly.
- Insert keywords into subheadings naturally to help search engines understand the page content better.
-
URL Optimization:
- Keep URLs short, include the primary keyword, and avoid unnecessary special characters or numbers.
-
Meta Description:
- Optimize the meta description to provide a concise, engaging summary of the post (around 155-160 characters).
- Include the primary keyword and a call to action, such as “Learn more” or “Discover more.”
-
Keyword Density:
- Maintain a keyword density of about 1-2% of the total word count and avoid overusing keywords to prevent keyword stuffing.
-
Internal Linking:
- Add internal links to related posts to increase user dwell time and improve internal linking structure.
- Example: "Check out our detailed guide on optimizing WordPress website speed."
-
External Linking:
- Add links to reputable external sources to increase the credibility of the post.
-
Image Optimization:
- Use alt tags containing keywords to describe images and compress images to enhance page load speed.
-
Quality Content:
- Write easy-to-read content with proper grammar and short paragraphs for better readability.
- Provide useful, valuable information that addresses user concerns or queries.
Optimizing posts and web content according to the above criteria will make your WordPress website SEO-friendly and attract more organic traffic from search engines.
Using HTTPS Protocol
Implementing HTTPS protocol not only helps secure data between users and the website but also plays a significant role in SEO rankings. Google has confirmed that websites using HTTPS have an advantage in search results compared to those using HTTP. Therefore, HTTPS is essential in WordPress SEO optimization.
Benefits of HTTPS for SEO and Users:
- Data Security: Protects user data from being intercepted by hackers.
- Increased Trust: Browsers display a lock icon next to the URL for HTTPS websites, making users feel secure.
- Improved Search Rankings: HTTPS is a positive ranking factor according to Google, contributing to better SEO performance.
Steps to Install HTTPS for WordPress Websites:
-
Install an SSL Certificate:
- Contact your hosting provider to install an SSL certificate (many providers offer free SSL certificates, such as Let’s Encrypt).
- Ensure that the SSL certificate is successfully activated on your domain.
-
Redirect HTTP to HTTPS:
- Install the Really Simple SSL plugin to automatically redirect all HTTP URLs to HTTPS.
- Double-check that all internal links and images use HTTPS instead of HTTP to avoid "Mixed Content" errors.
-
Update Google Search Console:
- After switching to HTTPS, update the HTTPS version of your website in Google Search Console to ensure that Google indexes the correct version.
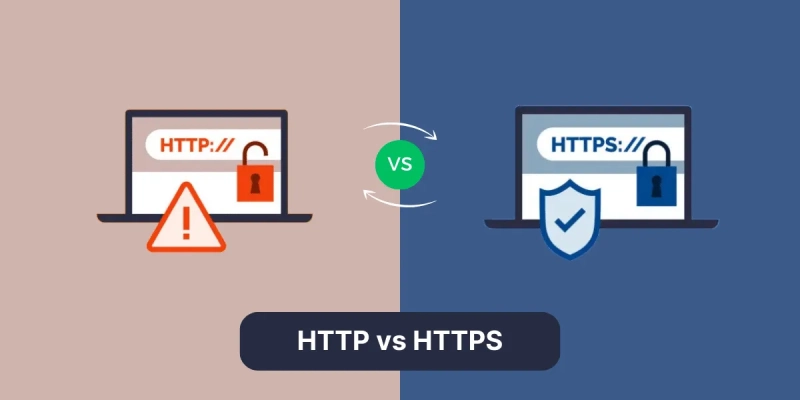
Switching to HTTPS not only enhances website security but also improves credibility, user experience, and SEO performance. Regularly check links and elements on your site to avoid Mixed Content errors that could affect SEO performance and website security.
Read more to understand why HTTPS is essential for SEO: What is HTTPS?
Using Categories and Tags Effectively in WordPress
Categories and Tags are powerful tools in WordPress that help organize content, enhance navigation, and improve SEO if used correctly. However, if misused, they can lead to duplicate content issues, reducing SEO effectiveness.
How to Use Categories and Tags Effectively:
-
Maintain a Reasonable Number of Categories and Tags:
- Use around 3-6 main categories to keep the site structure organized and focused on key topics.
- Each post should belong to only one main category to avoid duplicate URLs.
-
Name Categories and Tags with Keywords:
- Choose short, keyword-rich names for categories and tags to enhance indexability.
- Example: A category named "WordPress SEO Guide" is more effective than a generic name like "Basic SEO."
-
Avoid Creating Too Many Tags:
- Refrain from creating tags that only appear in one post, as they don’t add SEO value but dilute content.
-
Optimize Category and Tag URLs:
- In Settings → Permalinks, you can shorten category and tag URLs by removing prefixes such as “category” or “tag” (plugins like Yoast SEO can assist with this).
-
Create Optimized Archive Pages:
- Provide a brief description for each category to help search engines understand the topic of the posts within.
- Example: “The WordPress SEO category provides articles that guide you in optimizing your WordPress website from basic to advanced levels.”
Using categories and tags strategically improves user experience (UX) and helps search engines accurately index your content. This not only makes your site easier to navigate but also boosts the ranking potential of your category pages.
Building an Effective Internal Linking Strategy
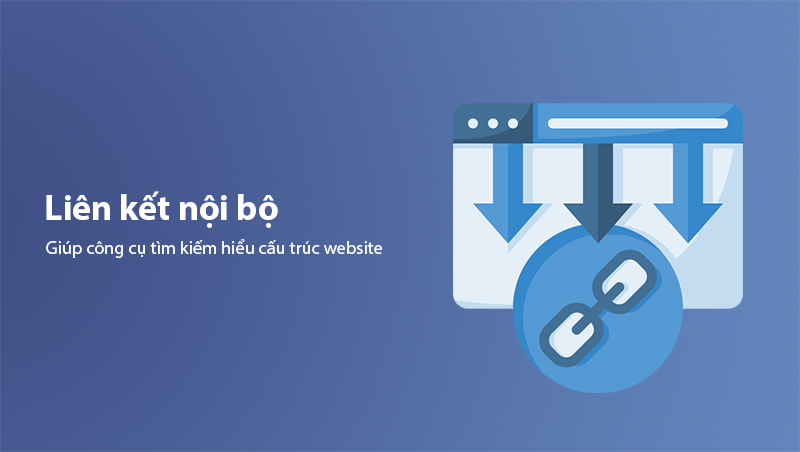
Internal links are links from one page on your website to another page on the same domain. Internal linking is vital for helping search engines understand your website structure and distributing PageRank evenly across pages. An effective internal linking strategy increases user engagement time and improves the rankings of important pages.
Steps for Building Effective Internal Links:
-
Link to Related Posts:
- Add links within content to direct readers to related posts with extended or complementary information.
- Example: "Check out our detailed guide on image optimization for WordPress to improve loading speed and SEO."
-
Use Keywords as Anchor Text:
- Anchor text (the clickable text for links) should contain relevant keywords related to the linked page’s content.
- Avoid vague phrases like "click here" or "read more."
-
Link from New Posts to Old Posts:
- When writing new posts, link to older related posts to enrich the internal linking structure and keep older content indexed.
-
Limit the Number of Internal Links:
- Don’t overload a post with too many internal links as it can overwhelm readers. Aim for 3-5 internal links per post, depending on the content length.
-
Link to Important Pages Like “Homepage,” “Services,” “Contact”:
- Include internal links leading to pillar pages so that search engines understand these pages as key content on the website.
Proper internal linking not only improves user experience but also helps search engines crawl your site more efficiently, boosting SEO rankings across the website. A strong internal linking strategy creates a cohesive link network that increases the ranking potential of less prominent pages.
Optimizing WordPress Comments for SEO
Comments aren’t just a platform for readers to discuss and exchange ideas but also contribute significantly to WordPress SEO when managed properly. An active comment section increases user engagement and time on page, improving On-page SEO. However, poorly managed comments can lead to spam and lower your website quality.
Tips for Optimizing Comments for SEO:
-
Enable Comment Moderation:
- Go to Settings → Discussion in the WordPress dashboard.
- Enable the option “Comment must be manually approved” to filter out spam comments or harmful links.
-
Encourage Meaningful Comments:
- Encourage readers to leave insightful comments related to the post content instead of short remarks like “Great!” or “Thanks.”
- Ask engaging questions within the post to stimulate discussion, e.g., “Have you tried any effective SEO strategies? Share your experience in the comments!”
-
Use Anti-Spam Plugins:
- Install plugins like Akismet Anti-Spam to automatically filter spam comments.
- This reduces the workload of manual moderation and keeps the site professional.
-
Display Comments in a Logical Order:
- Configure comments so that quality discussions appear at the top, making it easier for readers to find valuable exchanges.
-
Enable Nofollow for Links in Comments:
- Ensure that links in comments have the nofollow attribute to prevent spam links from affecting your site’s SEO credibility.
- Use plugins like Remove Comment Links to automatically remove unwanted URLs in usernames.
Managing comments well not only fosters a positive interaction environment but also boosts your site’s SEO rankings by increasing page engagement and credibility.
Nofollow External Links on Your Website
When adding external links to your posts, it’s essential to be cautious to avoid lowering your website’s SEO credibility. Links pointing to unreliable websites or promotional links should have the nofollow attribute to signal to search engines that you are not "passing" SEO authority (PageRank) to those sites.
Why Use Nofollow Links?
- Prevent PageRank Transfer: Ensures that your website does not lose SEO points when linking to external pages.
- Avoid SEO Penalties: If your site contains too many outbound links to unreliable sites or paid links without nofollow, you may be penalized by Google for violating its policies.
- Control Advertisement Links: Links in sponsored posts or affiliate links should have the nofollow attribute to prevent them from being classified as spammy links.
How to Add Nofollow Attributes in WordPress:
- Manually Add Links:
- When inserting a link, select "Open in new tab" and add the rel="nofollow" attribute in the HTML link tag. Example:
<a href="https://example.com" rel="nofollow">Read More</a>
- When inserting a link, select "Open in new tab" and add the rel="nofollow" attribute in the HTML link tag. Example:
- Using Support Plugins:
- Plugins like External Links or Rel Nofollow Checkbox help automatically add the nofollow attribute to external links without requiring manual editing.
Which Links Should Have Nofollow?
- Sponsored or affiliate links.
- Links to unrelated or low-authority sites.
- Links in user comments to avoid spammy links.
Properly using nofollow helps you control external links, avoid SEO penalties, and maintain your website’s credibility. Meanwhile, dofollow links can be used to point to authoritative sources to increase the post’s trustworthiness and provide additional value to readers.
Optimizing WordPress Website Security
Website security is an important factor that not only protects user data and site content but also impacts SEO. A website that has been hacked or contains malware may be flagged or removed from search results by Google, significantly reducing traffic. Therefore, optimizing WordPress security is essential in the website SEO process.

Steps to Optimize WordPress Website Security:
-
Update WordPress and Plugins Regularly:
- Always update to the latest versions of WordPress, plugins, and themes to patch any security vulnerabilities.
-
Use Strong Passwords:
- Use complex passwords for admin accounts and other user accounts.
- Combine uppercase, lowercase, numbers, and special characters to increase password strength.
-
Install Security Plugins:
- Use plugins like Wordfence Security, iThemes Security, or Sucuri Security to protect your website from attacks.
- These plugins offer malware scanning, suspicious activity monitoring, and login protection with firewalls.
-
Enable Two-Factor Authentication (2FA):
- Set up two-factor authentication for admin accounts to add an extra layer of security during login.
-
Limit Login Attempts:
- Use plugins like Limit Login Attempts Reloaded to limit the number of failed login attempts and prevent brute-force attacks.
-
Regular Data Backups:
- Install plugins like UpdraftPlus to schedule regular backups of your entire website data, making it easier to restore in case of an attack or system failure.
-
Use HTTPS:
- Ensure your website uses HTTPS to secure the connection between users and your server, especially for pages with personal data forms or transactions.
-
Hide the Default Login URL:
- Change the default login URL
domain.com/wp-adminto avoid attacks from bots or hackers targeting the default path.
- Change the default login URL
Benefits of Security Optimization:
- Maintains website stability and prevents disruptions caused by attacks.
- Increases user trust when visiting your website.
- Prevents Google from marking your site as dangerous or removing it from search results, thus protecting your SEO rankings.
Combining security optimization with your SEO strategy will help your website achieve higher rankings, maintain safety, enhance user experience, and ensure long-term stability.
Optimizing Website Speed and Performance
Page loading speed is a crucial factor in WordPress SEO as it directly impacts user experience and search engine rankings. Google prioritizes fast-loading websites when indexing and ranking. A slow website can decrease user engagement, increase bounce rates, and cause users to leave before the content is fully loaded.

Ways to Optimize Website Speed and Performance:
-
Use Quality Hosting:
- Choose a hosting provider with stable speed, SSD storage, and servers close to your target audience's location.
- Trusted hosting providers include SiteGround, Cloudways, or WPX Hosting.
-
Install a Caching Plugin:
- Plugins like WP Rocket, W3 Total Cache, or LiteSpeed Cache store static versions of your website to speed up loading times.
-
Compress Images:
- Use tools or plugins like Smush, Imagify, or ShortPixel to reduce image file sizes without compromising quality.
- Opt for the WebP format to save bandwidth and improve loading speed.
-
Use CDN (Content Delivery Network):
- Services like Cloudflare distribute content from servers closest to users, significantly reducing page load times.
-
Optimize CSS, JavaScript, and HTML:
- Minify the source code by removing unnecessary spaces, comments, and combining CSS/JS files to reduce the number of requests.
- Plugins like Autoptimize or Asset CleanUp make this process simple.
-
Reduce Unnecessary Plugins:
- Uninstall or replace unused or heavy plugins to prevent slow performance.
- Choose multi-functional plugins instead of installing many single-purpose plugins.
-
Lazy Load:
- Enable Lazy Load to load images and videos only when users scroll to their positions, reducing the initial page load time.
-
Regular Speed Tests:
- Use tools like Google PageSpeed Insights, GTMetrix, or Pingdom Tools to monitor website performance and fix speed-related issues.
Benefits of Optimizing Website Speed:
- Improves SEO Rankings: Faster websites are prioritized in Google search results.
- Enhances User Experience: A fast-loading site encourages users to stay longer.
- Reduces Bounce Rates: Faster pages help retain users, increase conversions, and decrease bounce rates.
Optimizing website speed and performance is an integral part of a sustainable SEO strategy. A fast website not only pleases search engines but also builds credibility and retains loyal users.
Image Optimization for WordPress SEO
Images play an important role in improving user experience, but if not properly optimized, they can slow down page load times and negatively impact SEO. Optimizing images improves page loading speed, increases visibility in Google Image Search, and ensures your website runs smoothly.
Steps to Optimize Images for SEO:
-
Use SEO-Friendly File Names:
- Avoid generic filenames like
IMG123.jpg. - Use file names that include keywords and describe the image content, e.g.,
wordpress-seo-guide.jpg.
- Avoid generic filenames like
-
Use Alt Text (Alternative Text):
- Add short, keyword-rich alt text to help search engines understand the image content.
- Example: “Basic WordPress SEO guide for beginners.”
-
Compress Image Sizes:
- Use tools or plugins like Smush, ShortPixel, or Imagify to reduce image file sizes without losing quality.
- Prefer using lightweight formats like WebP over PNG or JPEG to save bandwidth.
-
Set Proper Image Dimensions:
- Avoid using images larger than necessary for display on the website.
- Ensure images are responsive for various device sizes.
-
Enable Lazy Load:
- Activate the Lazy Load feature to load images only when users scroll to their positions. This reduces the initial page load time.
- Plugins like Lazy Load by WP Rocket or built-in lazy load options in optimization plugins are effective solutions.
-
Add Image Descriptions:
- For important images like charts or infographics, add detailed descriptions below the images to provide context for both users and search engines.
-
Optimize Background Images:
- Avoid using overly large images as backgrounds, and consider using CSS for simple design elements instead of loading large images.
Benefits of Image Optimization for SEO:
- Improves Page Load Speed: Lightweight images help the website load faster and improve search rankings.
- Increases Visibility in Google Images: Optimized images with alt text and keywords have a higher chance of appearing in image search results.
- Enhances User Experience: A website with clear and fast-loading images keeps users engaged longer.
Image optimization is a key factor in On-page SEO, making your website not only visually appealing but also efficient and search-engine friendly.
Leveraging Social Media for SEO Support
Social media not only helps drive traffic but also indirectly supports the WordPress SEO process. When your content is shared widely on social platforms such as Facebook, Twitter, LinkedIn, or Instagram, your website can gain more natural backlinks, increasing authority and search rankings.

How to Leverage Social Media for SEO:
-
Add Social Media Sharing Buttons to Posts:
- Install plugins like Social Snap, ShareThis, or AddToAny to add social media sharing buttons directly in your posts.
- This makes it easier for users to share valuable content with their network.
-
Optimize Open Graph and Twitter Card:
- Use plugins like Yoast SEO or Rank Math to optimize Open Graph tags (for Facebook) and Twitter Cards (for Twitter) to display the correct images and descriptions when shared.
-
Create Shareable Content:
- Use catchy headlines, attractive images, and interactive content like polls, infographics, or helpful tip lists.
- High-viral potential content encourages organic sharing.
-
Consistent Social Sharing:
- Schedule regular posts on social media to maintain visibility and engage with your target audience during peak activity times.
-
Engage with Users:
- Quickly respond to comments and questions on social media posts to increase engagement.
- Increased interaction builds brand credibility and encourages users to revisit your website.
-
Build Backlinks Through Social Media:
- Encourage influencers or communities to share your posts to gain backlinks from reputable sources.
Benefits of Leveraging Social Media for SEO:
- Increase Organic Traffic: Social media helps bring your content closer to new users.
- Improve Brand Recognition: Frequent appearances on social platforms strengthen your brand and increase credibility.
- Enhance Engagement Metrics: Shares, comments, and clicks on your content can indirectly improve your ranking on search engines.
Combining your WordPress SEO strategy with Social Media Marketing activities not only increases traffic but also creates a strong viral effect, improving your position in search engine results.
Choosing the Right WordPress Theme
A WordPress theme plays an essential role in ensuring your website is not only visually appealing but also SEO-friendly and efficient. A lightweight, well-optimized theme improves loading speed, enhances user experience, and is easily compatible with SEO support plugins. Conversely, a heavy theme with poor coding can slow down your website and negatively impact SEO rankings.
Criteria for Choosing an SEO-Friendly WordPress Theme:
-
Responsive Design:
- Ensure the theme displays well on all devices, including desktops, tablets, and mobile phones.
- Google prioritizes mobile-friendly websites when indexing and ranking pages.
-
Optimized Loading Speed:
- Choose a theme with clean code that doesn’t contain excessive CSS or JavaScript files.
- Avoid themes with too many complex effects that can slow down page loading.
-
Compatibility with SEO Plugins:
- Ensure the theme is compatible with popular plugins like Yoast SEO, Rank Math SEO, WP Rocket, etc.
- This ensures that you can easily install and run SEO support tools without errors.
-
Optimized Heading and Breadcrumb Structure:
- The theme should have a logical H1, H2, H3 tag structure to help search engines understand the content layout.
- Integrated breadcrumbs (internal link navigation) help users navigate the site and enhance SEO.
-
Lightweight and Clean Code:
- Choose themes that are well-built and avoid multi-purpose themes if unnecessary, as they often contain unused features that increase page size.
Recommended SEO-Friendly WordPress Themes:
- GeneratePress: Known for its fast loading speed and lightweight build.
- Astra: SEO-optimized, offers many customization options, and works well with page builders.
- OceanWP: Beautifully designed, easy to customize, and offers a powerful free version.
- Neve: A modern theme with excellent performance and AMP compatibility for faster mobile loading.
Benefits of Choosing the Right Theme:
- Faster Page Load Time: Reduces user wait times, increasing conversion rates and user retention.
- SEO-Friendly On-page Elements: An SEO-ready theme makes it easier to optimize title tags, meta descriptions, and internal links.
- Reduced Plugin Conflicts: A compatible theme ensures smooth operation without errors when installing essential plugins.
Choosing the right WordPress theme not only ensures your website looks professional but also provides a solid foundation for easy SEO optimization and stable performance across all devices.
Optimizing On-page SEO Factors
On-page SEO involves optimizing individual web pages to help search engines understand your content and improve your ranking in search results. A well-optimized On-page SEO strategy can attract higher traffic and increase conversion rates.
Key On-page SEO Factors to Optimize:
-
Title Tag:
- Include primary keywords in the title and ensure it doesn’t exceed 60 characters.
- The title should be compelling, informative, and contain a call-to-action.
- Example: "Effective WordPress SEO Guide - Tips from A to Z."
-
Meta Description:
- Write a short description between 150-160 characters summarizing the content.
- The meta description should include the main keyword and evoke curiosity to increase the click-through rate (CTR).
-
Heading Tags (H1, H2, H3):
- Ensure each post has only one H1 tag as the main headline.
- Subheadings H2, H3 should be well-structured to help search engines easily understand the content layout.
-
Content Optimization:
- Include primary and secondary keywords naturally within the content, avoiding keyword stuffing.
- Use short paragraphs and break down content into sections with subheadings for better readability.
-
SEO-Friendly URL:
- Keep URLs short, include the main keyword, and remove unnecessary words like “and,” “of,” etc.
- Example:
https://domain.com/wordpress-seo-optimization.
-
Images and Alt Tags:
- Use high-quality images with appropriate dimensions and add alt tags containing keywords to improve image SEO.
-
Internal and External Links:
- Add internal links to related posts to increase user dwell time and improve indexation.
- Use external links to reputable sources to enhance the credibility of your content.
-
Mobile-Friendly Content:
- Ensure your post displays well on mobile devices with clear fonts and appropriately sized images.
- Test your website's mobile-friendliness using Google Mobile-Friendly Test.
Benefits of On-page SEO Optimization:
- Higher Search Rankings: Your website can easily rank on top search results when meeting SEO criteria.
- Increased CTR: Attractive titles and meta descriptions increase user clicks.
- Longer User Dwell Time: Informative, easy-to-read content keeps users engaged and reduces bounce rates.
Optimizing On-page SEO factors is crucial to building an SEO-friendly website, ensuring your posts are not only search engine-friendly but also provide the best user experience.
Using Yoast SEO Plugin for Effective SEO Optimization
Yoast SEO is one of the most popular plugins for SEO optimization on WordPress, helping users manage On-page SEO factors such as meta tags, keywords, content structure, and XML Sitemaps. With its user-friendly interface and detailed analysis features, Yoast SEO allows users to improve their content according to SEO standards without requiring technical knowledge.
Steps to Use Yoast SEO for Post Optimization:
-
Install and Activate Yoast SEO Plugin:
- Go to the WordPress Dashboard → Plugins → Add New.
- Search for “Yoast SEO” and click Install → Activate.
-
Optimize Title Tags and Meta Descriptions:
- In the post editor, scroll down to the Yoast SEO section.
- Enter the SEO title and meta description with the main keyword, ensuring they stay within the character limit.
-
Focus Keyphrase Analysis:
- Enter the main keyword of your post in the "Focus Keyphrase" field for Yoast SEO to analyze optimization levels.
- Ensure the keyword appears in the title, URL, meta description, H1 tag, and key sections of the content based on Yoast SEO’s recommendations.
-
Content Analysis:
- Yoast SEO will analyze the post length and suggest adjustments if the content is too short or lacks necessary elements such as subheadings (H2, H3), internal links, and external links.
-
Readability Check:
- Yoast SEO checks the readability of your content, including sentence length, short paragraphs, and appropriate headings.
- If the readability score is good, the Yoast SEO indicator turns green.
-
Create an XML Sitemap:
- Go to SEO → General → Features and enable XML Sitemap.
- The sitemap file is automatically created and updated whenever a new post or page is added.
-
Configure Social Meta Tags:
- Yoast SEO supports adding images and descriptions for posts shared on social media to increase user clicks.
Advantages of Yoast SEO:
- Detailed SEO Analysis: Provides specific suggestions to improve content based on SEO best practices.
- Automatic Sitemap Management: Helps search engines index your website more effectively.
- Social Media Optimization: Ensures that content appears correctly when shared on social platforms.
Verifying Your Website on Other Search Engines
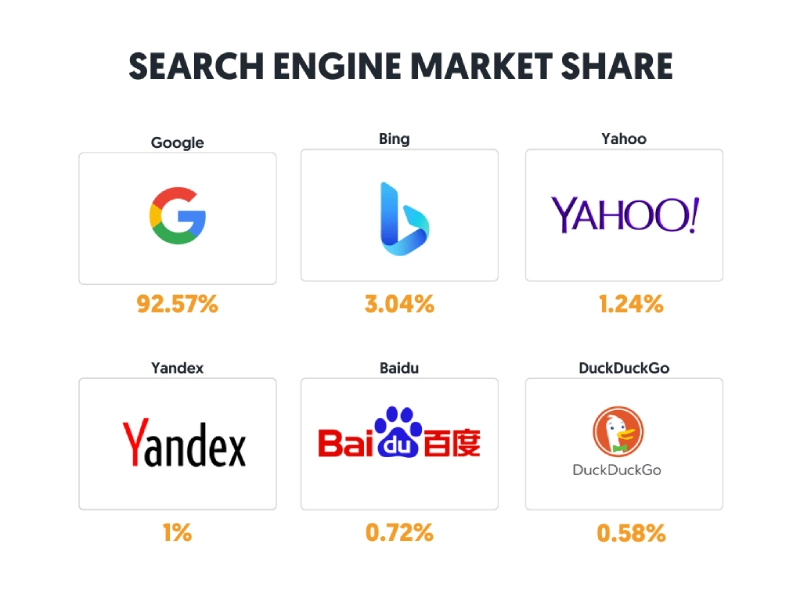
In addition to verifying your website on Google Search Console, adding your website to other search engines such as Bing Webmaster Tools and Yandex Webmaster can increase indexation and expand your reach to users in different markets. While Google is the most popular search engine, optimizing for other platforms ensures a more comprehensive SEO approach.
Steps to Verify Your Website on Bing Webmaster Tools:
-
Log into Bing Webmaster Tools:
- Visit Bing Webmaster Tools.
- Log in with your Microsoft, Google, or Facebook account.
-
Add Your Website:
- Click Add a Site, enter your website URL, and click Next.
-
Verify Website Ownership:
- Bing offers verification methods similar to Google Search Console, such as uploading an HTML file, adding a meta tag, or a DNS record.
- Choose the appropriate method and follow the instructions to complete verification.
Steps to Verify Your Website on Yandex Webmaster:
-
Log into Yandex Webmaster:
- Visit Yandex Webmaster.
- Log in with your Yandex account or register a new account.
-
Add Your Website:
- Enter your website URL and click Add.
-
Verify Ownership:
- Choose verification via meta tag, HTML file, or DNS record, similar to the process for Google Search Console and Bing Webmaster Tools.
Benefits of Verifying Your Website on Multiple Search Engines:
- Increased Indexation: Ensures that your content is indexed by search engines other than Google.
- Expand Market Reach: Platforms like Bing and Yandex are popular in regions such as the US, Europe, and Russia.
- Detailed Analytics: Provides additional data on traffic and performance from different search engines for a comprehensive SEO evaluation.
Creating Archive Pages to Support SEO
Archives pages are important navigation tools on WordPress websites, helping to organize and display posts by categories such as publication month, category, author, or tags. Archive pages not only make it easier for users to find content but also help search engines understand your content structure, improving indexability and enhancing user experience.
Benefits of Creating Archive Pages:
- Improved Navigation: Helps users easily discover older content without scrolling too much or manually searching.
- Increased Dwell Time: Archive pages displaying related posts can increase the click-through rate (CTR) and keep users on the website longer.
- Supports SEO: Strengthens the internal link network, making it easier for search engines to crawl and index all content.
How to Create Archive Pages in WordPress:
-
Manually Create an Archive Page:
- Go to Pages → Add New.
- Name the page Archives.
- Use shortcodes or simple PHP snippets to display a list of posts by date, month, or category.
-
Use Archive Plugins:
- Plugins like Simple Yearly Archive or WP Archives Widget make it easy to display lists of posts by various criteria such as year, category, or author.
- You can customize the widget to display the archive page in the sidebar or footer for easy user access.
-
Optimize URL and Meta Tags:
- Keep the archive page URL short, e.g.,
https://domain.com/archives. - Write an attractive meta description and include relevant keywords to optimize the archive page.
- Keep the archive page URL short, e.g.,
Tips for Optimizing Archive Pages for SEO:
- Add Subheadings (H2, H3) to clearly categorize archive sections such as "Posts by Category" or "Posts by Date."
- Remove Excess Content: Avoid displaying the full content of posts in the archive list to prevent duplicate content issues.
- Use Breadcrumbs: Display breadcrumb navigation to help users navigate the website more easily.
Optimizing Heading Tags H1, H2, H3, H4…
Heading tags (H1, H2, H3, H4) are essential elements of On-page SEO that help structure content clearly and make it more readable. They not only assist readers in understanding the layout of a post but also help search engines quickly grasp the structure and main topics of your webpage. When optimized correctly, heading tags can significantly contribute to improving the ranking of your post in search results.
How to Effectively Use Heading Tags in SEO:
-
H1 Tag – Main Title of the Post:
- Each page or post should have only one H1 tag, usually the post's title.
- The H1 tag should include the primary keyword and have an appropriate length, not exceeding 70 characters.
- Example: "Comprehensive WordPress SEO Guide from Basics to Advanced."
-
H2 Tag – Primary Subheadings:
- Use H2 tags for main sections to divide the post into clear sections.
- Naturally insert secondary keywords in H2 tags to help search engines better understand the details of your post.
-
H3 and H4 Tags – Secondary and Tertiary Subheadings:
- Use H3, H4 tags to break down subtopics within sections, enhancing readability and preventing the post from being too long and difficult to follow.
- Example: If the H2 heading is "Steps to Optimize Your Post," the H3 headings could be "Optimize the Title," "Optimize the URL," etc.
-
Maintain Heading Hierarchy:
- Avoid disorganized heading levels or skipping levels (e.g., using H4 right after H1 without any H2 or H3).
- The heading order should be logical and support smooth information flow.
-
Use Keywords Wisely:
- Insert keywords into H2, H3 tags, but avoid keyword stuffing.
- Headings should be concise and accurately describe the content below them.
-
Check Headings with SEO Tools:
- Use tools like Google Search Console, Ahrefs, or SEO Meta in 1 Click to ensure your post doesn’t have missing or duplicated heading tags.
Benefits of Optimizing Heading Tags:
- Improved User Experience: A well-structured post helps readers easily find the information they need.
- Helps Search Engines Understand Content: Search engines use headings to understand the structure and topic of the post.
- Increased Chance of Featured Snippets: Posts with clear and contextually relevant headings have a higher chance of appearing in Google's "Featured Snippets."
Optimizing heading tags is a crucial step in On-page SEO, making your content more readable and improving its ranking on search engines. A well-structured post not only retains readers but also signals professionalism and completeness to Google.
Optimizing Meta Description
The meta description is a short summary that appears below the page title in search results. Although Google doesn’t use meta descriptions as a direct ranking factor, an engaging meta description can increase the click-through rate (CTR), attracting more users to your website. Properly optimizing your meta description can bring significant benefits to your On-page SEO.
How to Write an SEO-Friendly Meta Description:
-
Appropriate Length:
- Keep the length between 150-160 characters to ensure the description isn’t truncated in search results.
- Avoid writing descriptions that are too short or too long, as this can reduce engagement and completeness.
-
Include Primary Keyword:
- Insert the primary keyword in the meta description to increase relevance between your post and user search queries.
- Keywords should appear naturally, without overstuffing.
-
Write Engaging Content with a Call-to-Action (CTA):
- Create curiosity or provide a solution to the reader's problem to encourage them to click on your post.
- Example: "Discover how to optimize your WordPress SEO and get your website ranked higher on Google. Learn more now!"
-
Avoid Duplicate Meta Descriptions:
- Each page or post should have a unique meta description to prevent duplicate content issues that could affect indexation.
-
Optimize for Mobile Devices:
- Check how the meta description displays on mobile devices to ensure it appears fully and isn’t truncated, as mobile users account for a large portion of web traffic.
Tips for Checking and Optimizing Meta Descriptions:
- Use tools like Yoast SEO and Rank Math SEO for suggestions on writing SEO-friendly meta descriptions.
- Use Google Search Console to monitor CTR and revise your meta description if the click-through rate is too low.
Benefits of Optimizing Meta Descriptions:
- Increase CTR: An engaging meta description encourages users to visit your website.
- Indirect Ranking Improvement: High CTR sends positive signals to Google, indicating that your content is valuable, potentially improving your ranking.
- Improve Brand Recognition: A well-optimized meta description with appropriate language helps create a positive impression of your brand.
Optimizing meta descriptions not only makes your website stand out in search results but is also a crucial step in improving overall SEO performance, retaining users, and increasing organic traffic effectively.
Optimizing SEO-Friendly Permalinks
Permalinks are the URLs that lead to posts, pages, or categories on your WordPress website. A short, clear permalink that includes the primary keyword makes posts easier to index and more attractive for users to click. Optimizing permalinks enhances the user experience and improves your website’s ranking on search engines.
How to Optimize SEO-Friendly Permalinks:
-
Configure Permalinks in WordPress:
- Go to Settings → Permalinks in the WordPress dashboard.
- Choose the “Post Name” option instead of default formats like "Day and Name" or "Numeric."
- Example:
- Non-optimized URL:
https://domain.com/?p=123 - Optimized URL:
https://domain.com/wordpress-seo-guide
- Non-optimized URL:
-
Keep URLs Short and Concise:
- Remove unnecessary words such as “and,” “of,” “is”… to make the URL concise.
- Example:
https://domain.com/seo-optimizationis better thanhttps://domain.com/guide-to-simple-wordpress-seo-optimization.
-
Include the Primary Keyword in the URL:
- Ensure the URL contains the primary keyword of the post to improve visibility in search results.
- Example: For a post with the keyword "WordPress SEO," the URL should be
https://domain.com/wordpress-seo-tips.
-
Avoid Changing URLs After Publishing:
- Changing permalinks after a post has been indexed will lose the value of the old links and impact SEO ranking. If changes are necessary, use a 301 Redirect to avoid losing traffic.
-
Remove Unnecessary Prefixes:
- You can remove prefixes like “category” or “tag” in the URL using plugins such as Yoast SEO or Remove Category Base to create shorter URLs.
Examples of SEO-Friendly URLs:
- Non-optimized URL:
https://domain.com/category/basic-seo-article-123 - Optimized URL:
https://domain.com/basic-wordpress-seo
Benefits of Optimizing Permalinks:
- Improved Readability: Short URLs with keywords help users understand the content before clicking.
- Better Indexability: Search engines can easily analyze and understand post content through the URL.
- Reduced Bounce Rate: Clear URLs increase user trust and encourage them to access the content.
Optimizing SEO-friendly permalinks not only makes your website look more professional but is also a key factor in strengthening its competitiveness in search results. It’s a simple yet impactful step toward improving overall SEO performance.
Optimizing Anchor Text
Anchor text is the clickable text in a hyperlink that directs users to another page within or outside your website. Optimizing anchor text helps search engines understand the content of the linked page, improving SEO rankings for both the source page and the destination page. If used incorrectly, anchor text can be marked as spam or reduce the user experience.
How to Optimize SEO-Friendly Anchor Text:
-
Use Relevant Keywords:
- Anchor text should contain the main keyword or related keywords of the destination page to increase relevance and indexation.
- Example: Instead of "click here," use "WordPress SEO optimization guide."
-
Diversify Anchor Text:
- Avoid using the same phrase repeatedly as anchor text for all links, as search engines may flag this as spam.
- Combine different types of anchor text, such as:
- Keyword-rich anchor: "WordPress SEO"
- Related phrase: "Optimize your WordPress site"
- Branded anchor: "OpenAI Homepage"
-
Avoid Generic Anchor Text:
- Limit using generic phrases like "click here" or "read more" as they provide little information about the linked page to both readers and search engines.
-
Avoid Keyword Stuffing in Anchor Text:
- Overusing keywords in anchor text may lead Google to penalize your site for keyword stuffing.
- Anchor text should be natural and fit the content context.
-
Link to Reputable Content:
- When adding external links, ensure they point to reputable and valuable content to increase your website’s credibility.
- For links to unrelated or sponsored content, use the nofollow attribute to protect your SEO quality.
-
Smart Use of Internal Links:
- Anchor text in internal links should guide readers to related posts within the same topic to enhance internal link structure and retain users longer.
Examples of Good and Bad Anchor Text:
- Good Anchor Text: "Learn more about WordPress speed optimization."
- Bad Anchor Text: "Click here to read more."
Benefits of Optimizing Anchor Text:
- Improved Search Ranking: Helps search engines understand the content of the linked page and boosts rankings for targeted keywords.
- Enhanced Navigation: Helps users easily access related content without having to search further.
- Keeps Users Engaged: Well-optimized internal links encourage users to explore other posts, increasing time on site and reducing bounce rates.
Optimizing anchor text is a small step with a big impact on SEO. Using relevant, natural link text not only improves the quality of the content but also builds a strong internal linking network, enhancing the overall SEO performance of the website.
Optimizing Breadcrumb Navigation
Breadcrumbs are a series of navigation links that show the path to the current page, helping users understand their location within the website structure and quickly return to main pages. Breadcrumbs improve user experience and help search engines better understand the website’s structure, thus supporting On-page SEO.
Common Types of Breadcrumbs:
- Hierarchy-based Breadcrumbs:
- Displays the user's location on the website in a hierarchical structure.
- Example: Home > Blog > WordPress SEO Guide.
- Path-based Breadcrumbs:
- Displays the path the user took to reach the current page.
- Attribute-based Breadcrumbs:
- Commonly used for e-commerce sites, showing product attributes like category and other options.
How to Set Up Breadcrumbs in WordPress:
-
Using Plugins:
- The Yoast SEO plugin has a built-in breadcrumb feature.
- Navigate to SEO → Search Appearance Settings → Breadcrumbs and enable the feature.
-
Using Themes with Built-in Breadcrumbs:
- Many WordPress themes, such as Astra and GeneratePress, have built-in breadcrumb options that can be enabled in the theme settings.
-
Customizing Breadcrumbs with Code:
- For more detailed customization, you can add PHP code to your theme to display breadcrumbs according to your preferences.
Optimizing Breadcrumbs for SEO:
- Optimize Titles: Breadcrumb links should include primary keywords like category names or post titles to support SEO.
- Use Schema Markup: Add schema markup for breadcrumbs so that search engines can display breadcrumb navigation more clearly on search result pages (SERP).
- Avoid Redundant Breadcrumbs: Ensure breadcrumbs aren’t too long or repetitive, especially on mobile devices.
Benefits of Breadcrumbs:
- Improved User Experience: Helps users navigate more easily and reduces bounce rates.
- Enhanced Indexing: Breadcrumbs provide additional context about website structure for search engines, improving indexation.
- Better SERP Display: Breadcrumbs can appear in search results, making your website look more professional and user-friendly.
Optimizing breadcrumbs makes your website look more professional and enhances navigation, improving both user experience and SEO performance. Breadcrumbs are a small yet crucial element in building an SEO-friendly and user-friendly website.
Optimizing 404 Pages and Redirect Links
A 404 page (Page Not Found) appears when users try to access a non-existent or broken link. If not optimized, 404 pages can disrupt the user experience and increase bounce rates, negatively affecting SEO. However, you can turn 404 pages into helpful tools to keep users engaged and redirect them to relevant content.

How to Optimize 404 Pages for SEO:
-
Create Friendly Content and Offer Solutions:
- Instead of displaying "Page Not Found," design a friendly and creative message to keep users engaged.
- Example: "Sorry, the page you’re looking for doesn’t exist. But you can explore other posts or return to the homepage."
-
Add Navigation Links:
- Include links to popular posts, main categories, or a return-to-home button to help users find relevant content.
-
Use 301 Redirects:
- If a URL no longer exists but has a new or similar version, set up a 301 redirect to guide users and search engines to the appropriate page.
- Plugins like Redirection make it easy to manage 301 redirects in WordPress.
-
Check and Fix Broken Links:
- Use tools like Google Search Console, Screaming Frog, or Ahrefs to detect 404 errors and fix them by updating or redirecting broken links.
-
Design a Professional 404 Page:
- Add images or fun messages to make users feel less frustrated when encountering a 404 error.
- Example: "Oops! You’ve landed on another planet, but don’t worry—we’ll help you get back on the right track!"
Benefits of Optimizing 404 Pages and Redirect Links:
- Keeps Users Engaged: A friendly and helpful 404 page reduces bounce rates and increases the likelihood of users continuing to explore your site.
- Improves SEO: Proper redirects maintain the SEO value of old pages and prevent ranking losses.
- Enhances User Experience: Providing alternative links or smart navigation helps users find the information they need easily.
Example of a Friendly 404 Message:
<h1>Sorry, the page you're looking for doesn't exist!</h1>
<p>
  But don’t worry! Check out our popular posts below or go back to the <a href="/">homepage</a>.
</p>
Optimizing 404 pages and redirects not only prevents traffic loss but also provides a professional user experience. It’s a crucial step for maintaining sustainable SEO rankings and building trust with users and search engines alike.
Optimizing Structured Data with Schema Markup
Schema Markup is a piece of code that helps search engines better understand your website content by providing detailed information about elements such as articles, products, events, recipes, etc. Using Schema Markup improves indexation and increases the chances of your website appearing in Rich Snippets or enhanced search results like star ratings, event times, and product prices.
Common Types of Schema:
-
Article Schema:
- Used for blog posts or news articles to display details such as the title, publish date, and author.
-
Breadcrumb Schema:
- Displays breadcrumbs in search results, helping users see the location of the post within the website structure.
-
FAQ Schema:
- FAQ schema displays a list of questions and answers directly in search results, improving CTR.
-
Product Schema:
- Displays product details such as price, availability, and star ratings in search results.
How to Add Schema Markup to WordPress:
-
Use Plugins:
- Install plugins like Schema Pro, Yoast SEO Premium, or Rank Math SEO to automatically add schema to posts or product pages.
- These plugins offer an intuitive interface where you can select the type of schema to apply without coding.
-
Manually Add JSON-LD Code:
- For more control, you can insert JSON-LD code into the
<head>section or post editor:
<script type="application/ld+json"> { "@context": "https://schema.org", "@type": "Article", "headline": "WordPress SEO Optimization Guide", "author": { "@type": "Person", "name": "Admin" }, "datePublished": "2025-01-04" } </script> - For more control, you can insert JSON-LD code into the
-
Validate Schema with Testing Tools:
- Use Google Rich Results Test or Schema Markup Validator to check if your schema markup is correctly implemented and identify any errors.
Benefits of Schema Markup:
- Enhanced Visibility: Rich Snippets make your website stand out in search results, increasing CTR.
- Contextual Clarity: Schema helps search engines understand the meaning of your content, not just the text.
- Indirect Ranking Boost: Although not a direct ranking factor, higher CTR from rich snippets can improve overall ranking.
Notes:
- Avoid overusing schema or adding irrelevant data to trick search engines, as this can lead to SEO penalties.
- Ensure that the content in the schema matches the actual page content to avoid "mismatched data" errors.
Optimizing Schema Markup not only makes your website more professional but also significantly increases the chances of appearing in prominent search result positions, attracting quality traffic, and improving sustainable SEO performance.
Optimizing Mobile SEO
With over 60% of internet traffic coming from mobile devices, mobile SEO optimization is crucial for maintaining high search rankings. Google has implemented Mobile-First Indexing, meaning it primarily uses the mobile version of your site for indexing and ranking. Therefore, an SEO-friendly website must perform well on both desktop and mobile devices.
How to Optimize Mobile SEO:
-
Use a Responsive Design:
- Ensure your theme or website template has a responsive design that adjusts automatically to fit all screen sizes (phones, tablets).
-
Optimize Mobile Page Speed:
- Improve mobile loading speed by:
- Compressing images using lightweight formats like WebP.
- Using AMP (Accelerated Mobile Pages) for lightning-fast article loading.
- Optimizing HTML, CSS, and JavaScript using plugins like Autoptimize or WP Rocket.
- Improve mobile loading speed by:
-
Improve Readability:
- Use sufficiently large fonts (at least 16px) and adequate spacing between paragraphs to prevent users from zooming or horizontal scrolling.
-
Optimize Mobile CTAs (Call To Actions):
- Ensure buttons like "Subscribe" or "Buy Now" are large enough and positioned accessibly without overlapping other elements.
-
Check and Fix Display Issues:
- Use Google Mobile-Friendly Test to check if your website is mobile-friendly. The tool provides suggestions for fixing issues such as small fonts, content overflow, or elements being too close together.
-
Optimize Images and Videos:
- Use lightweight images for mobile versions and avoid large video files that slow down the page.
- Implement lazy loading so that images and videos load only when users scroll to their location.
-
Check Layout and Content Display:
- Ensure all content on the desktop version is present on the mobile version to avoid missing important information.
- Avoid full-screen popups that disrupt the mobile user experience.
Benefits of Mobile Optimization:
- Higher SEO Ranking: Mobile-friendly websites are prioritized by Google in search results.
- Increased User Retention: A mobile-friendly interface helps users easily find information and interact smoothly, reducing bounce rates.
- Higher Conversion Rates: Mobile users tend to perform actions like subscribing or purchasing faster if the website loads quickly and displays well.
Mobile SEO optimization not only improves search rankings but also enhances user experience, increases conversion rates, and strengthens brand credibility online.
Conclusion
Optimizing SEO for a WordPress website is an ongoing process that requires a combination of technical and content-related efforts to ensure your website ranks high on search engines. From setting up the basics like SEO-friendly URL structures, internal links, and SEO plugins to advanced strategies such as integrating Schema Markup, improving page speed, and optimizing the mobile version — all these elements play a critical role in building an SEO-compliant website.
By following the right practices, you can not only improve keyword rankings but also enhance user experience, reduce bounce rates, and increase organic traffic. However, SEO is not a "set-it-and-forget-it" task. To maintain your position in the SERP, you need to regularly update your content, monitor website performance, and adapt to new search engine algorithms.
Remember, the ultimate goal is to create valuable, high-quality content for your audience. When you focus on delivering real value through quality content and optimizing technical aspects smartly, the results will go beyond improved SEO rankings — you’ll experience long-term growth and increased brand authority in the online space.
Latest Posts

Lesson 26. How to Use break, continue, and return in Java | Learn Java Basics
A guide on how to use break, continue, and return statements in Java to control loops and program execution flow effectively.

Lesson 25. The do-while Loop in Java | Learn Basic Java
A detailed guide on the do-while loop in Java, including syntax, usage, examples, and comparison with the while loop.

Lesson 24. How to Convert Decimal to Binary in Java | Learn Basic Java
A guide on how to convert numbers from the decimal system to the binary system in Java using different methods, with illustrative examples.

Lesson 23. How to Use the While Loop in Java | Learn Java Basics
Learn how to use the while loop in Java with syntax, real-world examples, and practical applications in Java programming.
Related Posts
What is Domain Authority? 13-Step Guide to Improve DA Score for Your Website in 2025
Discover what Domain Authority is and its importance in SEO. A detailed guide on the 13-step process to effectively increase DA, from content research and technical optimization to building quality backlinks for a sustainable SEO strategy.
What is Page Authority? The Importance of Page Authority for SEO in 2025
Learn what Page Authority (PA) is and its role in SEO optimization to help improve your website's ranking on search engines in 2025.

What is Google Index? A Guide to 13 Ways to Speed Up Website Indexing in 2025
Discover what Google Index is and learn detailed guidelines on 13 effective ways to get your website indexed quickly and boost your SEO rankings on Google in 2025.
![What is Onpage SEO? 23+ Basic & Advanced Onpage Optimization Checklist [2025]](/blog-posts/seo-onpage/seo-onpage-thumb.jpg)
What is Onpage SEO? 23+ Basic & Advanced Onpage Optimization Checklist [2025]
Learn the concept of Onpage SEO and the 23+ basic to advanced Onpage optimization checklist to improve website quality and boost search rankings effectively.

