WordPress Usage Guide From A to Z for Beginners
- Published on
- What is WordPress?
- Difference Between WordPress.com and WordPress.org
- Why is WordPress So Popular?
- Who Should Use WordPress?
- Setting Up WordPress - The First Step to Building a Professional Website
- System Requirements for WordPress
- How to Install WordPress on Hosting
- Access the Dashboard and Start Managing
- Getting to Know the WordPress Dashboard - The Heart of Your Website Management
- Structure of the WordPress Dashboard
- Basic Features of the Dashboard
- Tips for Working with the Dashboard
- Website Content Management: Posts, Pages, and Media
- Posts: Creating and Managing Blog Posts
- Pages: Creating Static Content
- Media: Managing the Library of Images and Videos
- Maximizing Posts, Pages, and Media
- Customizing Website Design with Themes
- What Are Themes?
- How to Install Themes
- Customizing Themes
- Popular WordPress Themes
- When to Change Themes
- Extend Website Functionality with Plugins
- What Are Plugins?
- How to Install Plugins
- Essential Plugins for WordPress Websites
- Managing Plugins
- Stand Out with Premium Plugins
- When to Remove Plugins
- Managing Users in WordPress
- User Roles in WordPress
- Adding New Users
- Managing Users
- Securing User Accounts
- When to Remove or Downgrade User Permissions
- Using Advanced Tools and Settings in WordPress
- Support Tools
- Advanced Settings
- Optimizing Website Performance
- When to Use Advanced Tools and Settings
- SEO Optimization for WordPress Websites
- Optimizing Permalinks
- Installing SEO Plugins
- Optimizing Content
- Optimizing Website Speed
- Improving User Experience (UX)
- Monitoring SEO Performance
- Securing Your WordPress Website – Keeping Data and Users Safe
- Regularly Update WordPress, Plugins, and Themes
- Use Strong Passwords and Enable Two-Factor Authentication (2FA)
- Limit Failed Login Attempts
- Backup Your Website Regularly
- Protect Critical Files
- Track Performance and Analyze Data with Google Analytics
- Benefits of Google Analytics
- How to Set Up Google Analytics for WordPress
- Frequently Asked Questions (FAQ)
- Is WordPress free?
- What’s the difference between WordPress.com and WordPress.org?
- Do I need coding skills to use WordPress?
- Can I create an online store with WordPress?
- How do I optimize my WordPress website’s speed?
- How can I back up my WordPress website?
- Is WordPress secure?
- My website is slow. What should I do?
- Can I create a multilingual website on WordPress?
- Conclusion
What is WordPress?
If you’re looking for a solution to build a website quickly, efficiently, and without requiring coding skills, then WordPress is the ideal choice for you. It is the world’s most popular CMS (Content Management System), powering over 40% of all websites today. From personal blogs and news sites to e-commerce stores, WordPress offers unmatched flexibility and a rich feature set to meet diverse needs.
Difference Between WordPress.com and WordPress.org
Before diving into how to use WordPress, it’s essential to understand the two main versions of the platform:
- WordPress.com: A free website hosting service suitable for beginners or those needing a simple website. However, it has limitations in control and customization.
- WordPress.org: A self-hosted version that offers full control and customization options. This guide focuses on WordPress.org to help you unlock the full potential of the platform.
Why is WordPress So Popular?
WordPress is not only famous for its ease of use but also for its outstanding benefits:
- User-friendly: Even without coding experience, you can easily manage content through its intuitive interface.
- SEO-friendly: Designed with SEO in mind, WordPress helps you achieve higher rankings on Google.
- Rich library of themes and plugins: With thousands of free themes and plugins, you can customize your website to suit your needs without incurring high costs.
- Large support community: You’ll never feel alone when facing challenges, thanks to its vast forums and online support groups.
Who Should Use WordPress?
- Personal Bloggers: WordPress is perfect for starting your journey in content sharing.
- Small Business Owners: A professional WordPress website helps you reach customers effectively.
- Online Sellers: With plugins like WooCommerce, you can build a fully functional online store in just a few hours.
- Developers and Designers: WordPress provides limitless customization options, making it ideal for complex projects.
This is just the beginning of your WordPress journey. In the next section, we’ll guide you through installing WordPress on hosting to start building your professional website.
Setting Up WordPress - The First Step to Building a Professional Website
Installing WordPress is the first step to creating a professional website. Whether you’re a beginner or have prior experience, the process is straightforward and quick if you follow the steps correctly. Below is a detailed guide to installing WordPress.org on your hosting.
System Requirements for WordPress
Before installation, ensure that your hosting meets the following requirements:
- PHP: Version 7.4 or higher (PHP 8.x is recommended for optimal performance).
- MySQL: Version 5.7 or higher, or MariaDB version 10.3 or higher.
- HTTPS: An SSL certificate for website security (most hosting providers offer free SSL).
If you haven’t selected a hosting provider yet, consider reliable services like Hostinger, Bluehost, or Mắt Bão in Vietnam.
Learn more: Guide to Choosing the Right Hosting for Your Website.
How to Install WordPress on Hosting
Step 1: Download WordPress from the Official Site
Visit WordPress.org and download the latest version of WordPress. The file will be in .zip format.
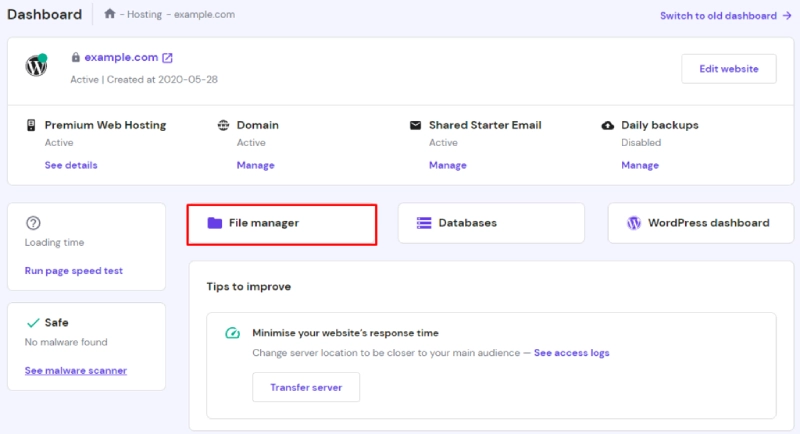
Step 2: Upload WordPress Files to Your Hosting
Use a file manager or FTP client (e.g., FileZilla) to upload the downloaded WordPress files to your website’s root directory (usually /public_html or /htdocs).
Step 3: Create a Database
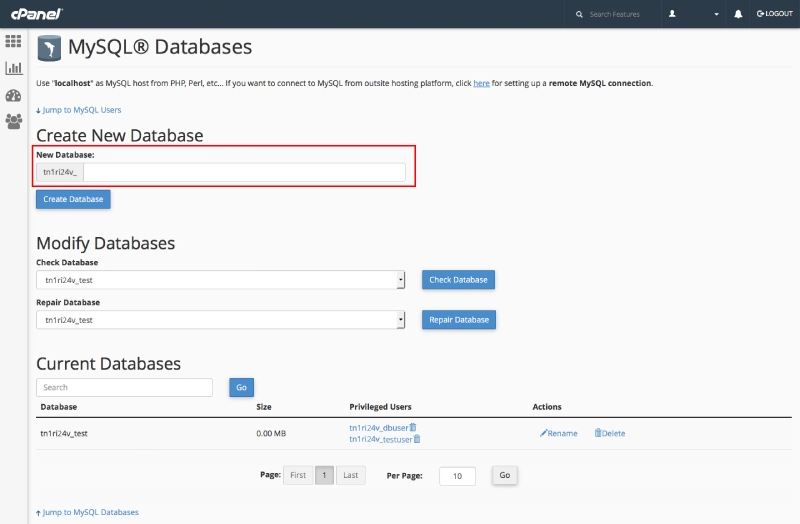
Access your hosting control panel (cPanel, Plesk, etc.) and navigate to MySQL Databases:
- Create a new database and save the database name, username, and password.
- Grant full privileges to the database user.
Step 4: Run the WordPress Installation Script
Open your browser and go to your domain. The WordPress setup wizard will appear:
- Choose your preferred language.
- Enter the database information (name, username, password).
- Complete the remaining steps to set up your website title, admin account, and password.
Note: Use a strong password and keep your admin credentials secure for better website security.
Access the Dashboard and Start Managing
After successfully installing WordPress, you can access the Dashboard at https://yourdomain.com/wp-admin. This is the control center for managing all website activities, from publishing posts and managing themes to configuring plugins.
In the next section, we’ll guide you through the WordPress Dashboard and its basic features, enabling you to start creating your website!
Getting to Know the WordPress Dashboard - The Heart of Your Website Management
Once WordPress is installed, the next step is to familiarize yourself with the WordPress Dashboard, where you manage all content and features of your website. The Dashboard is designed to be user-friendly and intuitive, even for beginners.
Structure of the WordPress Dashboard
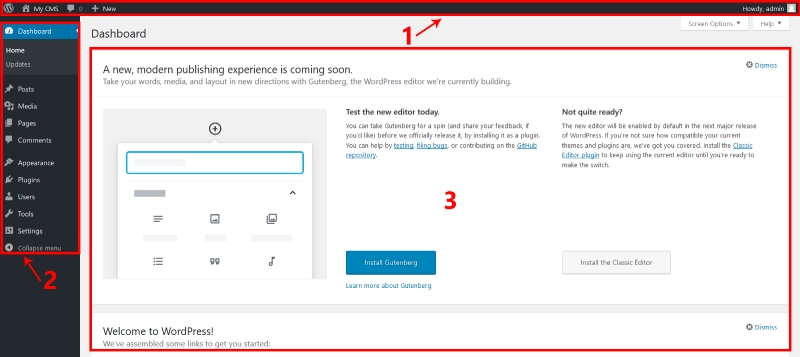
The Dashboard is divided into three main areas:
-
Admin Bar:
- Located at the top, it provides quick access to the homepage, content editing, updates, and account management.
- Easily check update notifications for plugins, themes, or the WordPress core.
-
Sidebar Menu:
- Positioned on the left, this is the primary navigation hub of WordPress.
- It includes key sections like Posts, Pages, Media, Appearance, Plugins, and Settings.
-
Main Workspace:
- The central area displays information, tools, or actionable items. For example, selecting Posts will show the list of all your website’s posts.
Basic Features of the Dashboard
Dashboard > Home
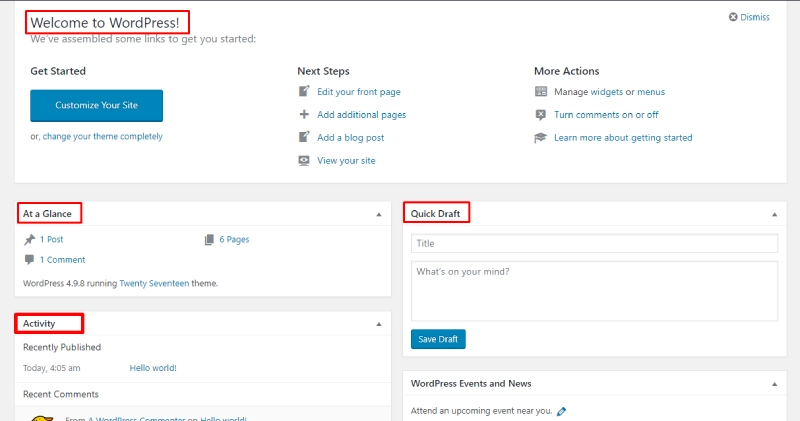
When logged in, the Home tab provides an overview of your website:
- Welcome to WordPress: A quick-start guide for beginners.
- At a Glance: Displays the number of posts, pages, and the WordPress version in use.
- Quick Draft: A simple tool to jot down ideas for future posts.
- Activity: Summarizes recent website activities, including the latest comments and post statuses.
Posts Section
From here, you can:
- View all posts currently published on your website.
- Create new posts using the modern Block Editor.
- Manage categories (Categories) and tags (Tags) for better organization.
Media Library
- Manage all uploaded images, videos, or documents effortlessly.
- Use the date filter to quickly locate older files.
- Upload new files directly here or during post creation.
Tips for Working with the Dashboard
- Take time to explore each menu item on the left. Don’t hesitate to experiment, as changes can often be undone, or you can seek help from the WordPress community.
- Regularly update WordPress, plugins, and themes to ensure stable and secure website performance.
- Focus on content: The Dashboard is a tool, but high-quality content is the key to your website’s success.
In the next section, we’ll show you how to manage posts, pages, and media to make your website professional and user-friendly!
Website Content Management: Posts, Pages, and Media
One of WordPress's strengths is its ability to manage content easily and flexibly. From posting new articles and creating static pages to managing images and videos, everything can be done directly from the Dashboard.
Posts: Creating and Managing Blog Posts
Posts are the most common type of content in WordPress, often used for blogs, news, or time-sensitive content.
Adding a New Post
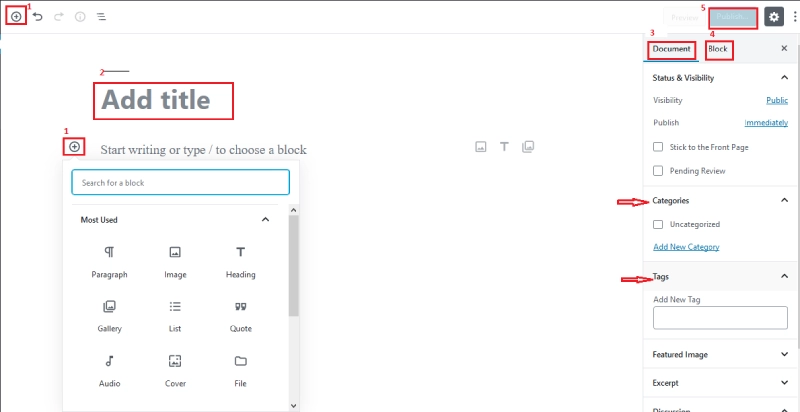
- Go to Dashboard > Posts > Add New.
- The Block Editor interface will open, providing tools to easily add text, images, videos, and other content blocks.
- Add Title: Enter the title of your post.
- Blocks: Use blocks to structure your content, including Paragraph, Heading, Image, Gallery, etc.
- Document Settings: Set the Category, Tags, and Featured Image for the post.
- Publish: Confirm and publish your post.
Managing Posts
- Go to Dashboard > Posts > All Posts to see a list of all posts.
- From here, you can quickly edit, delete, or change the status of a post (Draft, Published).
- Use filters by date or category to find posts more quickly.
Categories: Organizing Posts
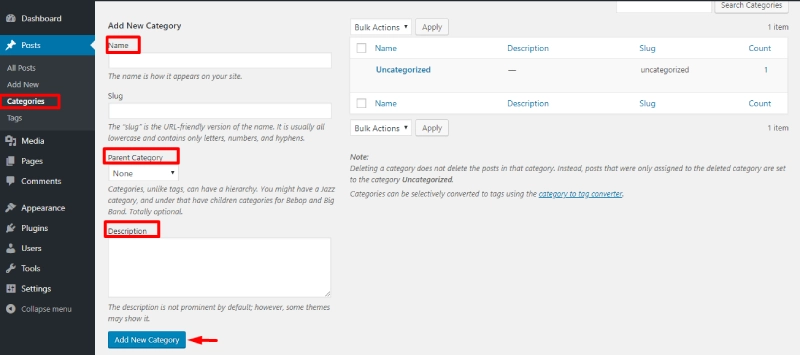
Categories in WordPress help you organize and classify posts effectively, making it easier for readers to find related content. Information for a category includes:
- Name: The name of the category as displayed to users.
- Slug: The URL-friendly version of the name. If left blank, WordPress will auto-generate a slug based on the category name.
- Parent Category: If the category is a part of a larger category, you can choose the parent category from the list. Select "None" for standalone categories.
- Description: A short description of the category. This is important for SEO, as some themes and SEO tools display this description.
Pages: Creating Static Content
Unlike posts, Pages are used for content that doesn’t change frequently, such as About, Contact, or Services.
Creating a New Page
- Go to Dashboard > Pages > Add New.
- The interface is similar to creating posts but lacks category and tag options.
- Parent Page: Set a parent page to organize pages into a hierarchy.
- Order: Arrange the order of pages for easier navigation.
Managing Pages
- Access Dashboard > Pages > All Pages to edit, preview, or delete existing pages.
- Use the Quick Edit function to quickly change titles or statuses.

Tip: Essential pages like Privacy Policy and Terms of Use should not be missing from any website.
Media: Managing the Library of Images and Videos
The Media Library is where you manage all multimedia files that have been uploaded, including images, videos, documents, and audio files.
Uploading New Files
- Go to Dashboard > Media > Add New, then drag and drop files from your computer to upload.
- Uploaded files are automatically saved in the library and ready to use.

Managing Media
- Go to Dashboard > Media > Library to view all uploaded files.
- You can search, edit information (title, description, alt text), or delete unnecessary files.
- Tip: Add SEO-friendly descriptions and alt text to images to improve article rankings on Google.
Maximizing Posts, Pages, and Media
- Use posts for regular updates to attract more traffic.
- Leverage static pages to provide essential information and guide visitors.
- Manage media efficiently to ensure images and videos are sharp but do not slow down the website.
In the next section, we will guide you on how to customize themes and add new features using Plugins, making your website stand out from competitors.
Customizing Website Design with Themes
A beautiful and professional website requires not only quality content but also an impressive design. In WordPress, you can easily change the look of your site with Themes—a library of templates offering thousands of free and premium options.
What Are Themes?
Themes in WordPress are design packages that allow you to change the entire appearance of your website in minutes. Themes not only determine how your site looks but also provide special features like layouts, color schemes, or widget areas.
How to Install Themes
WordPress offers two main methods for installing themes:
Method 1: Installing Themes from the WordPress Library
- Go to Dashboard > Appearance > Themes > Add New.
- Browse available free themes or search using keywords (e.g., "business," "blog").
- Click Install and then Activate to apply the theme to your website.
Method 2: Uploading Themes from Your Computer
- Download a theme file from a trusted source (usually in
.zipformat). - Go to Dashboard > Appearance > Themes > Add New > Upload Theme.
- Select the
.zipfile, click Install Now, and then Activate.
Choose responsive themes to ensure your site displays well on all devices.
Customizing Themes
After installing a theme, you can customize its components to fit your needs:
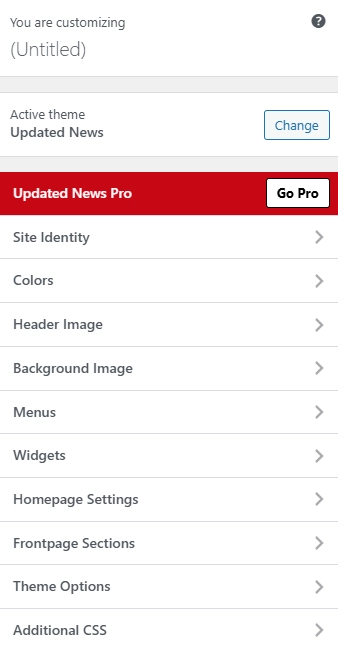
- Go to Dashboard > Appearance > Customize.
- Common options include:
- Site Identity: Change the logo, site title, and favicon.
- Colors: Adjust the color scheme of your theme.
- Header Image: Change the website’s header image.
- Menus: Manage navigation menus.
- Widgets: Add widgets to the sidebar, footer, or other areas.
Tips for Customizing Themes
- Always back up your website before editing theme code (if necessary).
- Avoid directly editing the original theme files. Use a Child Theme to save custom changes and avoid losing them during updates.
Popular WordPress Themes
If you're unsure which theme to choose, here are some recommendations:
- Astra: Fast, lightweight, and SEO-friendly.
- OceanWP: Packed with features for multi-purpose websites.
- Divi (premium): A powerful theme with an integrated drag-and-drop builder.

Learn More: Top 10 Free Themes for WordPress.
When to Change Themes
- When your current theme no longer meets your needs.
- When you want to optimize speed or improve user experience.
- When refreshing your brand or website style.
In the next section, we’ll guide you through installing and managing Plugins—tools that expand functionality, making your website more robust and professional.
Extend Website Functionality with Plugins
One of WordPress's standout features is its ability to extend functionality through Plugins. These add-ons allow you to integrate new features into your website without coding. From SEO and security to performance optimization, plugins help you manage your website effectively and professionally.
What Are Plugins?
Plugins in WordPress are software designed to expand or upgrade the platform's default functionality. You can find thousands of free plugins in the WordPress Plugin Directory, as well as premium plugins from third-party providers.
How to Install Plugins
Method 1: Install Free Plugins from the WordPress Directory
- Go to Dashboard > Plugins > Add New.
- Search for a plugin using keywords (e.g., "SEO," "Security").
- Click Install Now and then Activate to enable the plugin.

Method 2: Upload Plugins from Your Computer
- Download a plugin file from a trusted source (usually in
.zipformat). - Go to Dashboard > Plugins > Add New > Upload Plugin.
- Select the
.zipfile, click Install Now, and activate the plugin.
Essential Plugins for WordPress Websites
Here’s a list of popular and useful plugins every website should consider:
- Yoast SEO: Helps optimize posts and pages for search engines.
- Wordfence Security: Protects your site from threats like hackers or malware.
- WP Super Cache: Improves page loading speed by storing cached data.
- WooCommerce: Turns your website into an e-commerce store.
- Contact Form 7: Creates professional and easy-to-use contact forms.
Managing Plugins
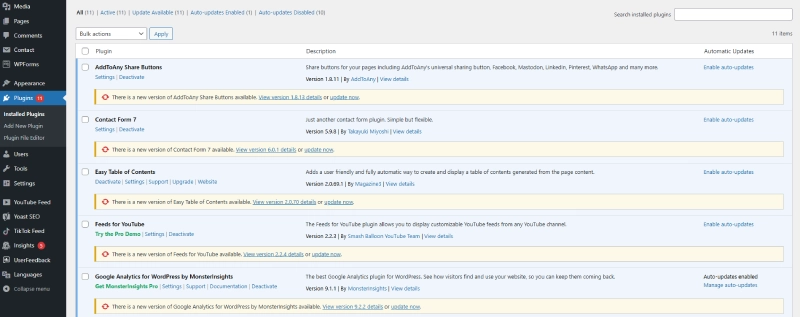
After installation, manage all plugins via Dashboard > Plugins > Installed Plugins:
- Activate/Deactivate: Enable or disable plugins as needed.
- Update Now: Update plugins to the latest version for improved functionality and security.
- Delete: Remove unnecessary plugins to reduce website load.
Tips for Using Plugins
- Avoid installing too many plugins: Overloading your site with plugins can decrease performance.
- Prioritize plugins with high ratings and regular updates.
- Backup your website before installing or updating critical plugins.
Stand Out with Premium Plugins
If you want to enhance your website’s capabilities, investing in premium plugins is worthwhile. These plugins often provide advanced features, customer support, and better security.
When to Remove Plugins
- When the plugin is no longer needed or replaced by another.
- When a plugin causes conflicts with themes or other plugins.
- When a plugin hasn’t been updated in a long time, posing security risks.
In the next section, we’ll guide you on how to manage users in WordPress, from assigning roles to enhancing security.
Managing Users in WordPress
As your website grows, managing users becomes essential to maintain performance and security. WordPress provides a robust user management system, allowing you to add, assign roles, and control user accounts with ease.
User Roles in WordPress
WordPress supports several user roles (roles) with varying levels of permissions:
- Administrator: Full control over all aspects of the website, including content, themes, plugins, and settings.
- Editor: Manages and edits all posts, including those created by others.
- Author: Can create and manage their own posts.
- Contributor: Can write posts but cannot publish them (requires approval).
- Subscriber: Can only manage their personal profile and cannot interact with website content.
Assign specific roles to minimize risks and protect critical website data.
Adding New Users
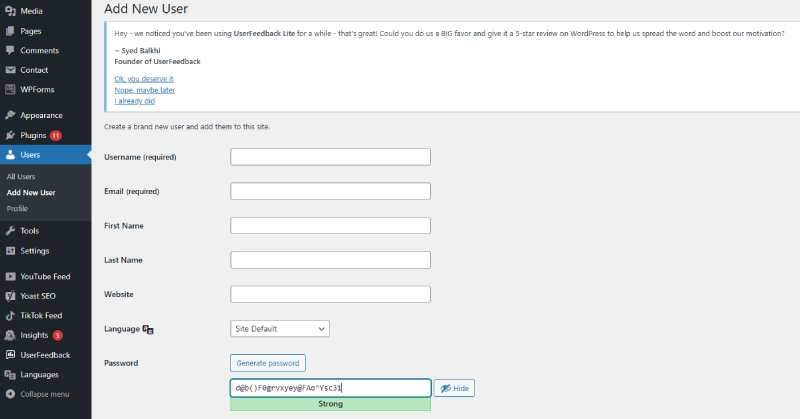
- Go to Dashboard > Users > Add New.
- Enter the required information:
- Username: The login name (cannot be changed later).
- Email: The email address associated with the account.
- Role: Assign the appropriate role.
- Password: WordPress generates a strong password, but you can customize it.
- Click Add New User to complete the process.
Important Notes When Creating Users
- Accurate email: Ensure the email is valid so users can reset passwords if needed.
- Appropriate roles: Avoid granting Administrator rights unless absolutely necessary.
Managing Users
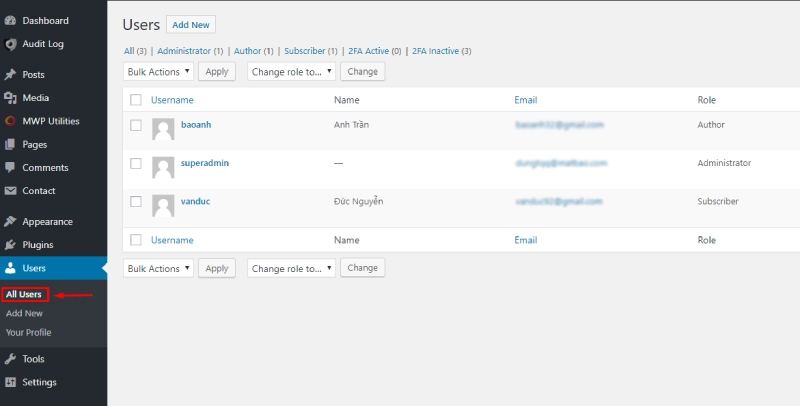
Manage the user list via Dashboard > Users > All Users:
- Edit: Modify account details, roles, or reset passwords.
- Delete: Remove inactive or unnecessary accounts.
- You can transfer content from deleted accounts to another user to avoid data loss.
- Bulk Actions: Perform batch operations like deleting or changing roles.
Securing User Accounts
Security is crucial to prevent abuse of user accounts:
- Use strong passwords: Passwords should include letters, numbers, special characters, and at least 12 characters.
- Enable two-factor authentication (2FA): Many plugins, such as Wordfence or Google Authenticator, offer this feature.
- Limit failed login attempts: Plugins like Limit Login Attempts protect against brute-force attacks.
- Monitor user activity: Use plugins like WP Activity Log to track user actions on the site.
When to Remove or Downgrade User Permissions
- When a user is no longer active on the website.
- When you suspect an account has been compromised.
- When roles need to be adjusted to match a new administrative structure.
In the next section, we’ll explore how to use advanced tools and settings in WordPress to optimize your site’s performance and functionality.
Using Advanced Tools and Settings in WordPress
WordPress isn’t just a simple content management system; it also offers advanced tools and settings to optimize your site’s performance, security, and scalability. Below are detailed instructions on leveraging these features to maximize WordPress’s potential.
Support Tools
Import and Export Data
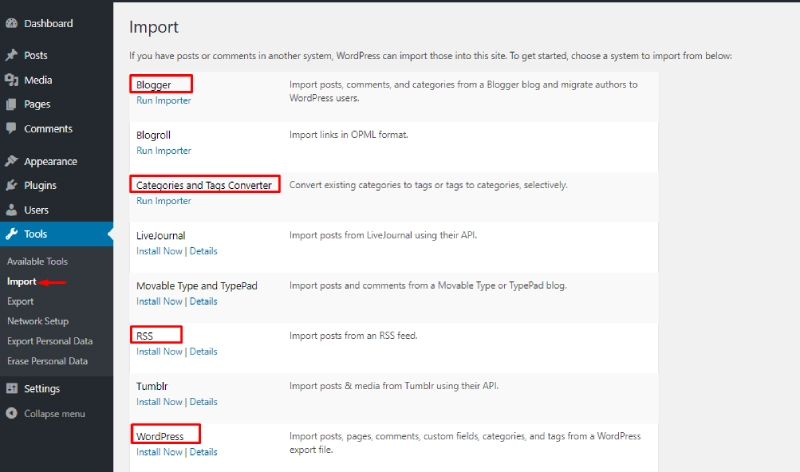
- Import: Import data from other platforms like Blogger, Tumblr, or even another WordPress site.
- Navigate to Dashboard > Tools > Import.
- Choose the appropriate tool and follow the instructions to upload data.
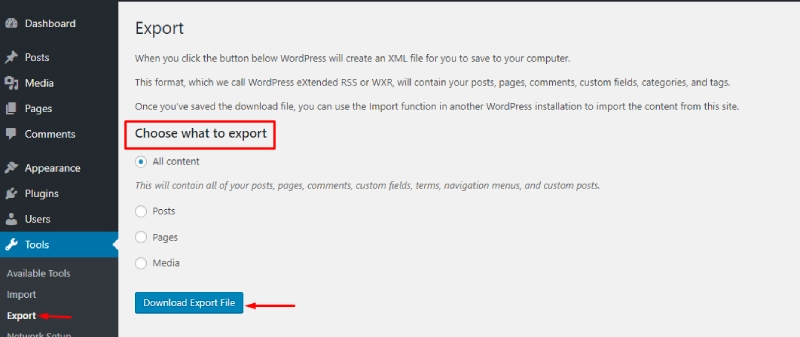
- Export: The export feature lets you back up all your posts, pages, or media.
- Go to Dashboard > Tools > Export, select the type of data to export, and download an XML file.
The Export feature is useful for migrating your site to a new host or creating backups.
Available Tools
Other helpful tools include:
- Press This: Quickly copy content from other websites into WordPress.
- Category and Tags Converter: Easily switch between categories and tags.
Advanced Settings
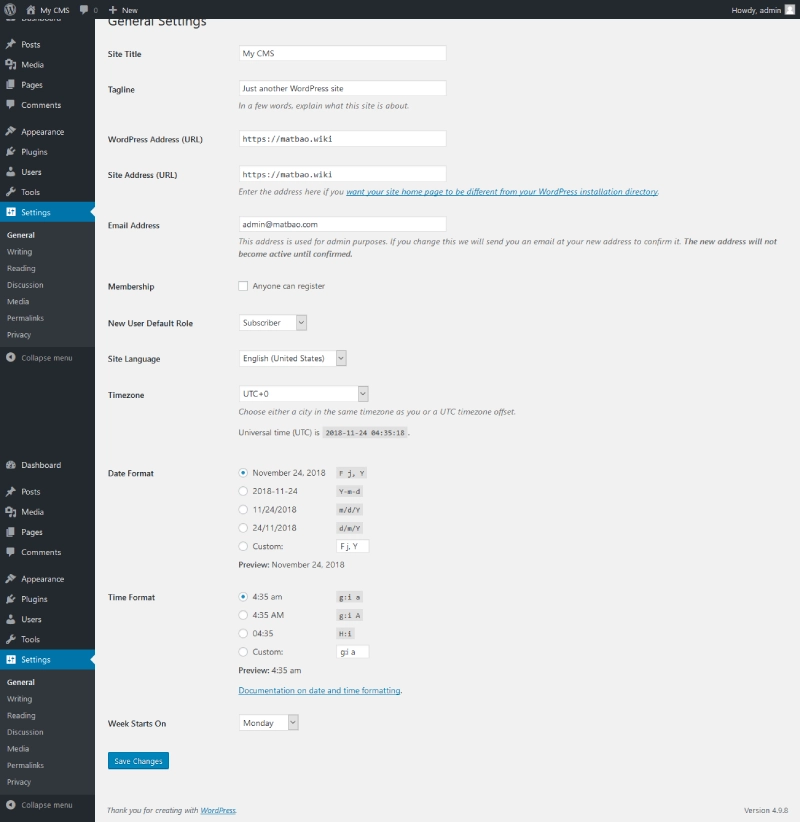
General Settings
- Modify the Site Title and Tagline.
- Set the Timezone and date/time formats appropriate for your region.
- Enable Membership to allow users to register accounts.
Permalinks Settings
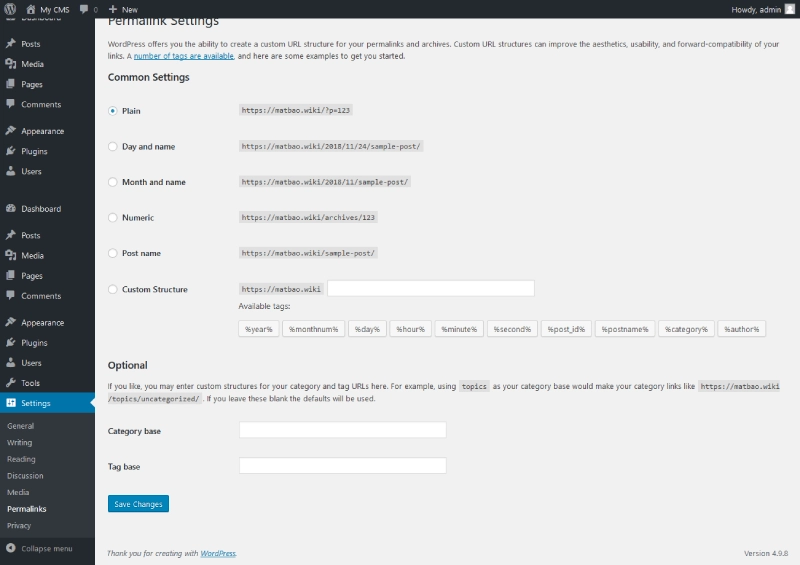
- Permalinks significantly affect your website's SEO.
- Navigate to Dashboard > Settings > Permalinks.
- Select the Post Name structure (https://yourdomain.com/sample-post/) for optimal SEO.
Media Settings
- Adjust the default image sizes for uploaded media to optimize storage and loading speeds.
- Choose to organize uploaded images into folders by month and year.
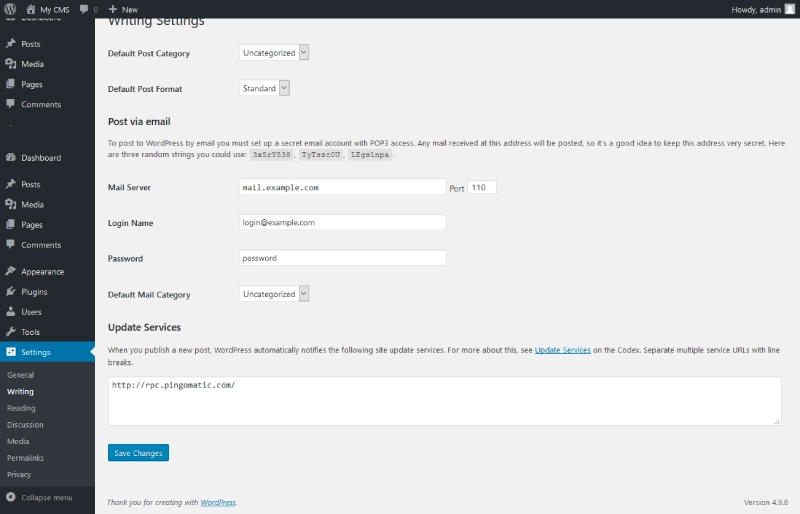
Writing Settings
- Default Post Category: Select the default category for posts in case you forget to assign one during posting.
- Default Post Format: Choose the default post format (Standard, Aside, Gallery, etc.). It's recommended to keep it at Standard unless specified otherwise.
- Post via E-mail: Enable posting via email by configuring an email address and server.
- Update Service: A ping service that notifies search engines about new content, defaulting to
http://rpc.pingomatic.com/.
Optimizing these settings ensures efficient posting and keeps content up to date.
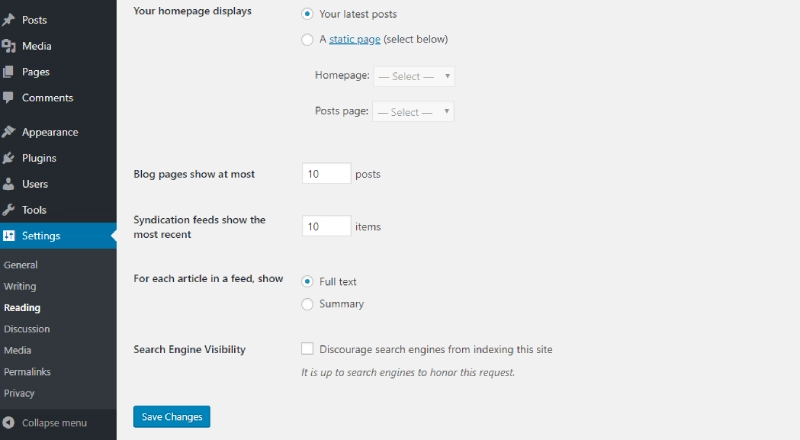
Reading Settings
- Your homepage displays: Choose your homepage display, either a list of your latest posts or a static page.
- Blog pages show at most: Set the number of posts displayed per blog page.
- Syndication feeds show the most recent: Define the number of recent posts shown in RSS Feeds (
http://domain/feed). - For each article in a feed, show:
- Full text: Display the complete content in RSS Feeds.
- Summary: Display a condensed version of the content.
- Search Engine Visibility: If selected, your website will not be indexed by search engines like Google.
Adjust these settings to control how your content appears on the homepage and other platforms.
Optimizing Website Performance
To ensure your WordPress website runs smoothly, implement the following:
- Limit failed login attempts: Use a plugin like Limit Login Attempts to prevent brute force attacks.
- Enable caching: Plugins like WP Super Cache or W3 Total Cache help reduce page load time.
- Compress images: Install plugins like Smush or ShortPixel to optimize image sizes without losing quality.
When to Use Advanced Tools and Settings
- When your website needs faster load times or handles large amounts of data.
- When ensuring data security and user account protection.
- When migrating your site or creating regular backups.
Next, we’ll guide you on optimizing SEO for your WordPress website to increase its visibility on major search engines like Google.
SEO Optimization for WordPress Websites
To achieve high rankings on search engines like Google, optimizing your website for SEO (Search Engine Optimization) is essential. WordPress provides powerful tools and features to streamline SEO optimization and enhance website visibility on search results.
Optimizing Permalinks
SEO-friendly URLs help search engines understand your content better. They should be concise, clear, and include primary keywords.
- Go to Dashboard > Settings > Permalinks.
- Select the Post Name structure so URLs appear as:
https://yourdomain.com/post-title.
Avoid URLs with special characters or excessive numbers.
Installing SEO Plugins
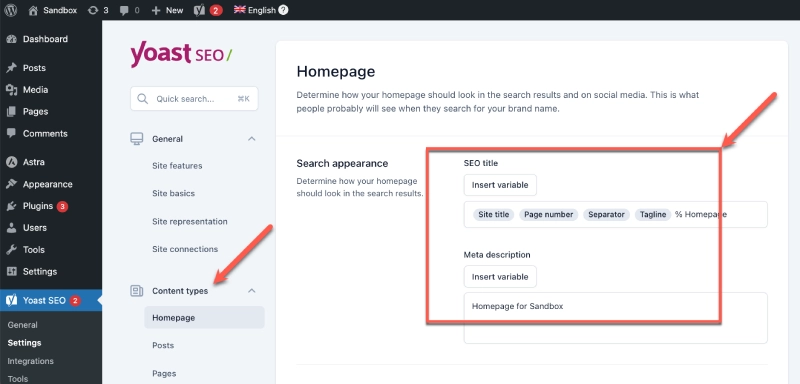
Yoast SEO
This is the most popular plugin for comprehensive SEO optimization. Key features include:
- Optimizing meta titles and meta descriptions for posts and pages.
- Suggesting improvements based on focus keywords.
- Automatically generating an XML sitemap for submission to Google.
How to install:
- Go to Dashboard > Plugins > Add New.
- Search for Yoast SEO, click Install Now, and then Activate.
- Follow the plugin's initial setup wizard.
Rank Math SEO
Similar to Yoast SEO, Rank Math SEO is another powerful choice with a user-friendly interface and free keyword optimization analysis.
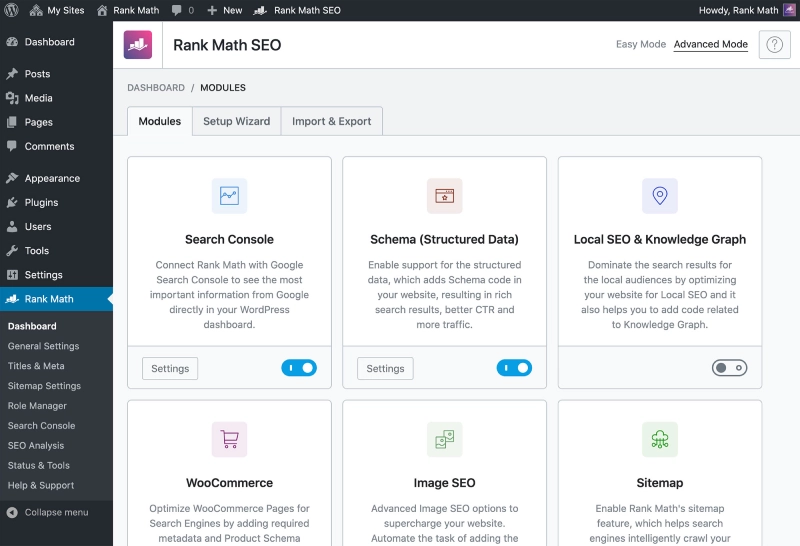
Use either Yoast SEO or Rank Math SEO. Refer to the Comparison: Yoast SEO vs. Rank Math – Which Plugin is Better? for a detailed review.
Optimizing Content
- Post Titles: Ensure the title includes the main keyword and is no longer than 60 characters.
- Heading Tags (H1, H2, H3): Use a clear structure with relevant secondary keywords.
- Keyword Density: Keep the primary keyword density around 1–2% of the content.
- Alt Text for Images: Add descriptive Alt text containing relevant keywords for each image.
Tip: Posts should ideally exceed 1,000 words, incorporate bullet points, and use short paragraphs to improve readability.
Optimizing Website Speed
Page speed is a critical factor in Google's ranking algorithm. Here’s how to optimize:
- Use caching plugins: Install WP Super Cache or W3 Total Cache to reduce load times.
- Optimize images: Use plugins like Smush or ShortPixel to compress images without quality loss.
- Utilize a CDN: Services like Cloudflare enhance loading speed by delivering content from the nearest server to the user.
Improving User Experience (UX)
- Responsive design: Ensure your site displays well on both desktop and mobile devices.
- Clear navigation menus: Use intuitive menus and breadcrumbs for easier content discovery.
- Internal linking: Increase user engagement by adding internal links to related content.
Monitoring SEO Performance
- Google Search Console: Free tool to detect SEO errors, monitor keywords, and submit XML sitemaps.
- Google Analytics: Track traffic, user behavior, and key traffic sources.
SEO optimization is an ongoing process. By following the steps above, you can increase your website's competitiveness on search engines. Next, we’ll show you how to secure your WordPress website to protect data and maintain stable operations.
Securing Your WordPress Website – Keeping Data and Users Safe
Security is crucial to ensuring your WordPress website remains stable and protected from cyberattacks. With millions of websites running on WordPress, the platform is a common target for hackers. However, the following measures can safeguard your website effectively.
Regularly Update WordPress, Plugins, and Themes
WordPress, along with plugins and themes, frequently releases updates to patch security vulnerabilities. Failing to update leaves your website vulnerable.
- Check for updates in Dashboard > Updates.
- Update as soon as notifications appear, especially for security patches.
Use a plugin like Easy Updates Manager to automate updates.
Use Strong Passwords and Enable Two-Factor Authentication (2FA)
- Strong passwords: Ensure passwords are at least 12 characters long, including uppercase, lowercase, numbers, and special characters.
- Two-Factor Authentication (2FA): Install plugins like Google Authenticator or Wordfence Login Security for added protection.
Limit Failed Login Attempts
Brute force attacks often involve guessing thousands of passwords to access admin accounts. Limiting failed login attempts can mitigate this risk.
- Install plugins like Limit Login Attempts Reloaded or Wordfence Security to lock accounts after a defined number of failed attempts.
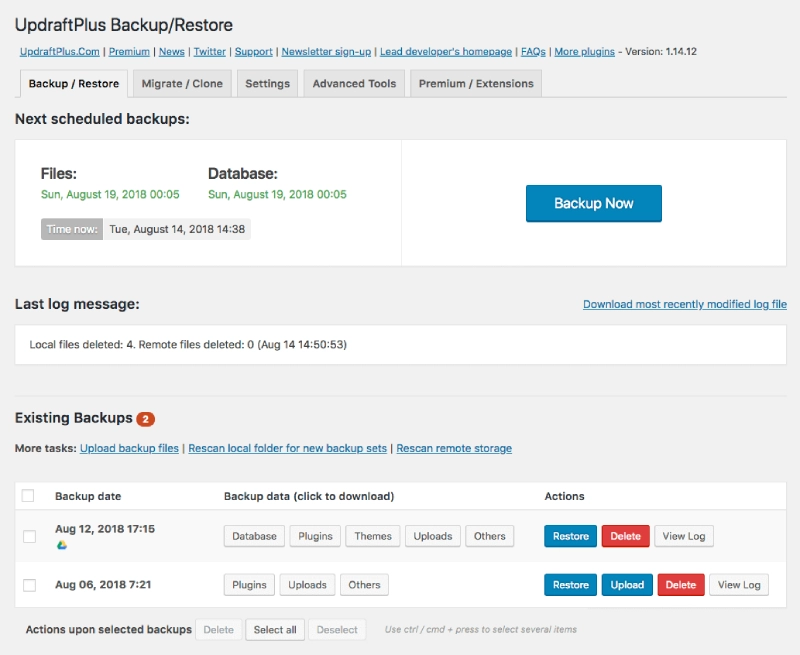
Backup Your Website Regularly
Backing up your data ensures you can restore your site to a secure state in case of an attack without losing content.
- Use plugins like UpdraftPlus or BackupBuddy for automatic backups.
- Store backups on cloud services like Google Drive or Dropbox.
Protect Critical Files
Certain WordPress files, like wp-config.php and .htaccess, contain sensitive information and should be secured.
- Hide wp-config.php file: Add the following code to your
.htaccessfile:<files wp-config.php> order allow,deny deny from all </files>
Track Performance and Analyze Data with Google Analytics
To grow your WordPress website effectively, it’s essential to understand user behavior, the most-visited pages, and traffic sources. Google Analytics is a free and powerful tool that enables you to monitor website performance and make data-driven optimization decisions.
Benefits of Google Analytics
Using Google Analytics, you can:
- Track traffic: Monitor the number of daily and monthly visitors to your website.
- Analyze user behavior: Understand where users come from, how long they stay, and which pages they interact with most.
- Evaluate SEO strategies: See which keywords and landing pages drive the most traffic.
- Identify traffic sources: Determine the proportion of visitors coming from Google, social media, email, or referrals from other websites.
Integrating Google Analytics not only optimizes website performance but also enhances your online marketing strategies.
How to Set Up Google Analytics for WordPress
Method 1: Using a Plugin
- Install the MonsterInsights or Site Kit by Google plugin from Dashboard > Plugins > Add New.
- Activate the plugin and connect it to your Google account.
- The plugin will automatically add the tracking code to your website.

Method 2: Manually Adding the Tracking Code
- Log in to your Google Analytics account at analytics.google.com and create a Property for your website.
- Copy the Global Site Tag (gtag.js) code provided by Google Analytics.
- Go to Appearance > Theme File Editor and paste this code into the
header.phpfile just before the</head>tag.
Frequently Asked Questions (FAQ)
Is WordPress free?
Yes, WordPress.org is an open-source and free platform. However, you’ll need to pay for associated services such as hosting, domain names, and premium themes or plugins if advanced functionality is required.
What’s the difference between WordPress.com and WordPress.org?
- WordPress.com: A free hosted service with limited customization. You cannot install plugins or custom themes unless you upgrade to paid plans.
- WordPress.org: A self-hosted platform that gives you full control and customization of your website. Ideal for professional projects.
Do I need coding skills to use WordPress?
No. WordPress is user-friendly and allows you to create and manage content without any coding knowledge. However, familiarity with HTML, CSS, or PHP can be helpful for deeper customization.
Can I create an online store with WordPress?
Yes, with the WooCommerce plugin, you can easily transform your WordPress website into a fully functional online store, complete with product management, payment gateways, and shipping options.
How do I optimize my WordPress website’s speed?
- Use caching plugins like WP Super Cache or W3 Total Cache.
- Optimize images with plugins like Smush or ShortPixel.
- Select high-performance hosting and enable a CDN.
- Optimize CSS, JavaScript, and HTML using Autoptimize.
Read more about How to Optimize WordPress Website Speed.
How can I back up my WordPress website?
You can use plugins like UpdraftPlus or BackupBuddy to automatically back up your website to cloud services like Google Drive or Dropbox.
Is WordPress secure?
WordPress is a highly secure platform, but you should take precautions such as:
- Regularly updating WordPress, plugins, and themes.
- Using strong passwords and enabling two-factor authentication (2FA).
- Installing security plugins like Wordfence or Sucuri Security.
My website is slow. What should I do?
- Test your site’s speed using Google PageSpeed Insights or GTmetrix.
- Optimize images and code files.
- Remove unnecessary plugins and themes.
- Upgrade to a high-performance hosting plan.
Can I create a multilingual website on WordPress?
Yes, plugins like WPML or Polylang allow you to add multiple languages to your website. Both are user-friendly and support SEO optimization.
This FAQ will help answer common queries and make getting started with WordPress easier. For more detailed information, feel free to contact us or explore other tutorials in our blog!
Conclusion
WordPress is a powerful and flexible platform suitable for everyone, from beginners to professional web developers. With its exceptional customization capabilities and a vast array of plugins and themes, you can easily create a website tailored to your needs, whether it’s a personal blog, an online store, a news site, or a business portfolio.
In this guide, we’ve covered everything from installing WordPress, managing content, and enhancing performance, to SEO strategies and securing your website. These steps will help you build a website that is not only visually appealing but also efficient and secure.
If you need further support or detailed information, don’t hesitate to reach out or check out other articles on our blog. Start building your website today and turn your ideas into reality!
Latest Posts

Lesson 26. How to Use break, continue, and return in Java | Learn Java Basics
A guide on how to use break, continue, and return statements in Java to control loops and program execution flow effectively.

Lesson 25. The do-while Loop in Java | Learn Basic Java
A detailed guide on the do-while loop in Java, including syntax, usage, examples, and comparison with the while loop.

Lesson 24. How to Convert Decimal to Binary in Java | Learn Basic Java
A guide on how to convert numbers from the decimal system to the binary system in Java using different methods, with illustrative examples.

Lesson 23. How to Use the While Loop in Java | Learn Java Basics
Learn how to use the while loop in Java with syntax, real-world examples, and practical applications in Java programming.
Related Posts
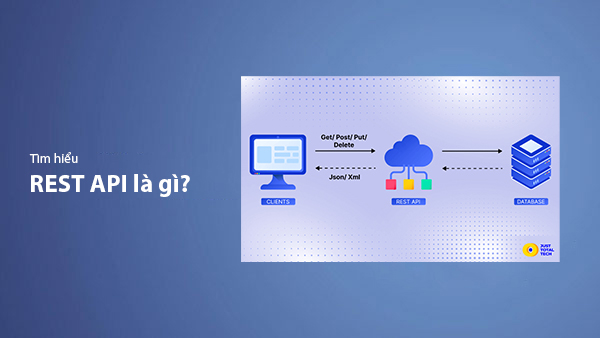
What is REST API? Complete A-Z Knowledge About REST API
REST API is one of the essential concepts that every backend developer needs to fully understand. This article provides comprehensive knowledge about REST API, including its definition, principles of operation, and how to build a standard RESTful API.
What is HATEOAS? How to Build APIs Using HATEOAS
Learn about HATEOAS, an important concept in API development, and how to build APIs using HATEOAS to improve interactivity and scalability.

What Is GraphQL? The Advantages of GraphQL Over REST API
Explore GraphQL, a modern API technology, and why it outperforms REST API in many web development scenarios.
What is XSS? Signs of Detection and Effective Prevention Methods
Learn about XSS, signs of detection, and effective prevention methods for XSS attacks in websites.

